Automating the Creation of Paper Magic Sheets using Excel and InDesign
by Ryan Bible / @professor_bible
Introduction
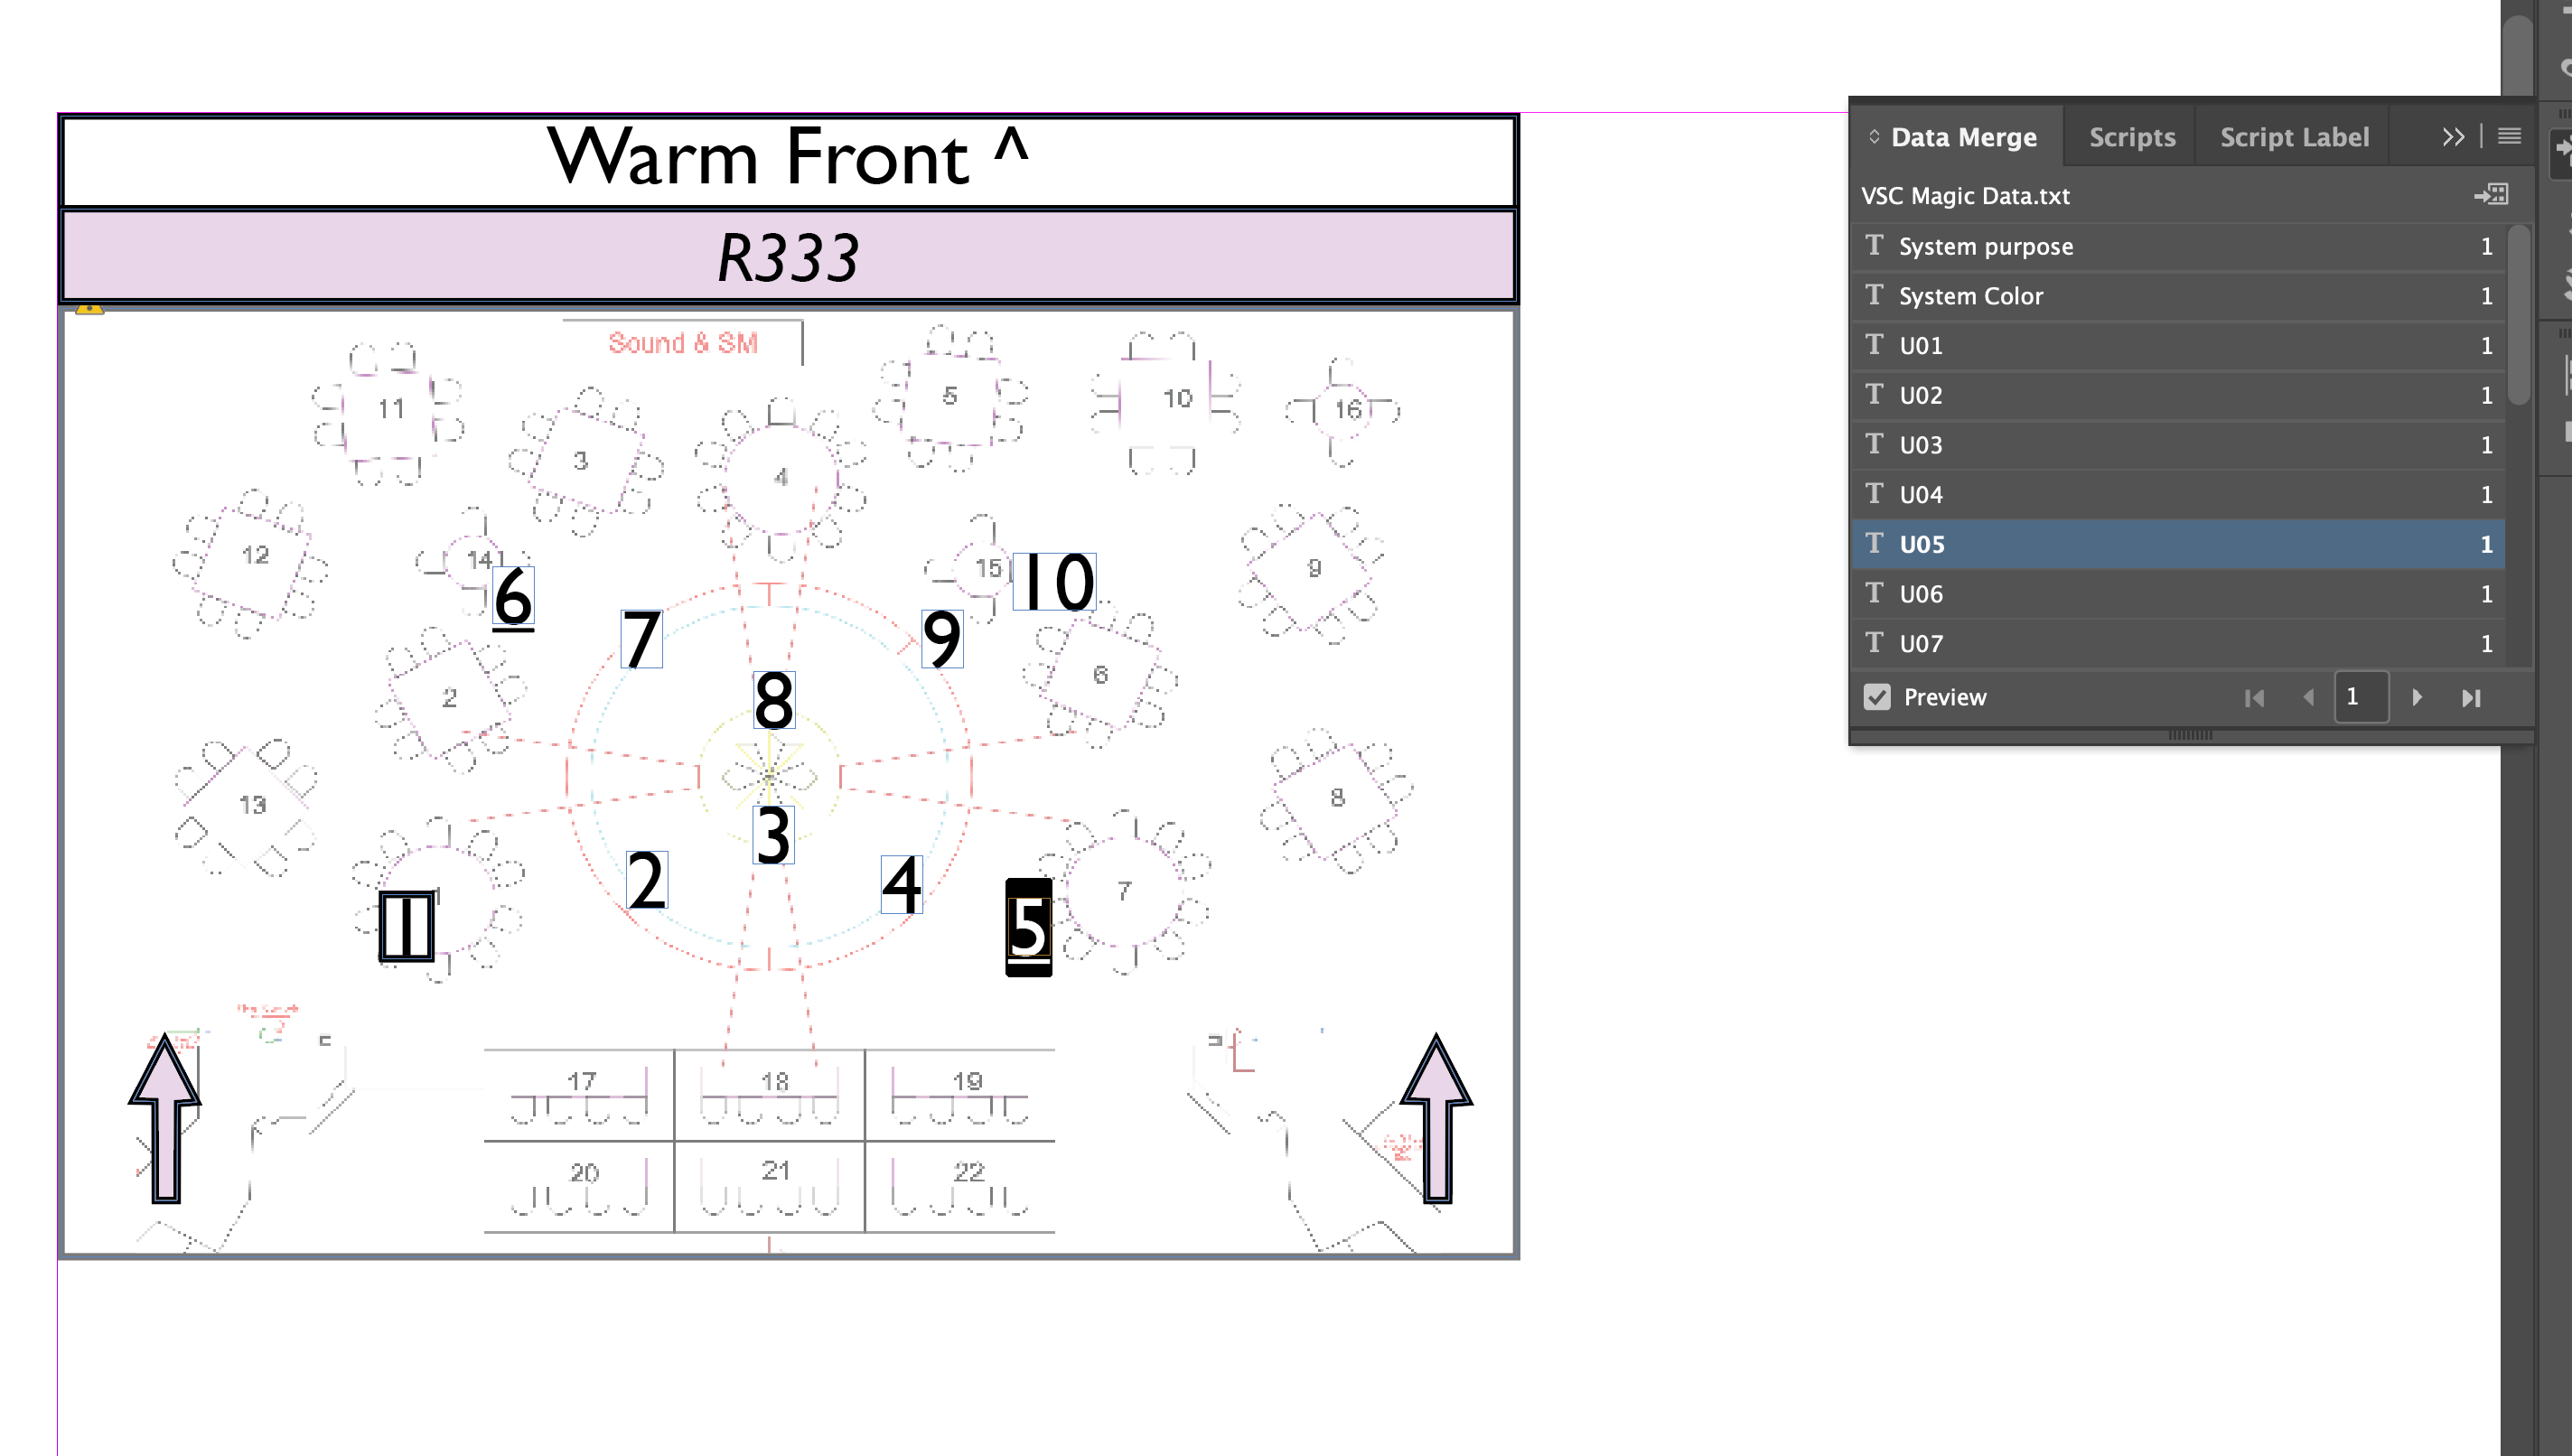
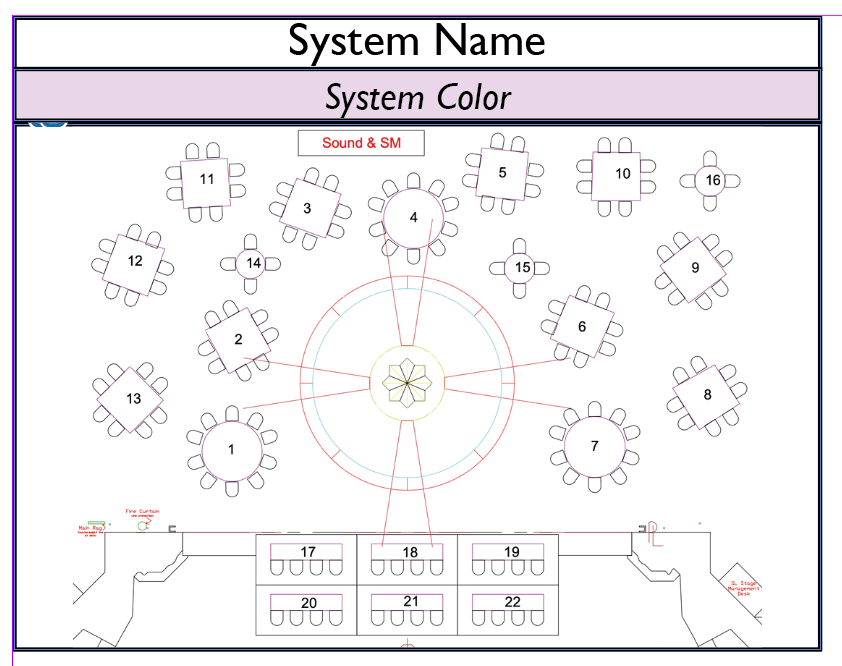
I’ve been infatuated with the idea of creating beautiful magic sheets for my designs. The problem with creating attractively laid-out magic sheets manually is that it’s exceedingly tedious and time-consuming. Copying and pasting, then changing relevant numbers and colors consume too much time. In most cases, I will create a magic sheet, at best, a day or two before programming a show in the theater. Sometimes I use the default cheat sheets that Lightwright generates as a stand-in when I don’t have the bandwidth to create my own. When I do have time, my preferred style is adapted from Lighting Designer Mike Wood’s excellent visual style. If you’re unfamiliar with this magic sheet style, the linked article is essential reading! One example of an adaptation I’ve made is how I denote group numbers. Numbers surrounded by a box represent the group that controls the entire system and any number with an underline selects the lights within the system in a single lane on stage.
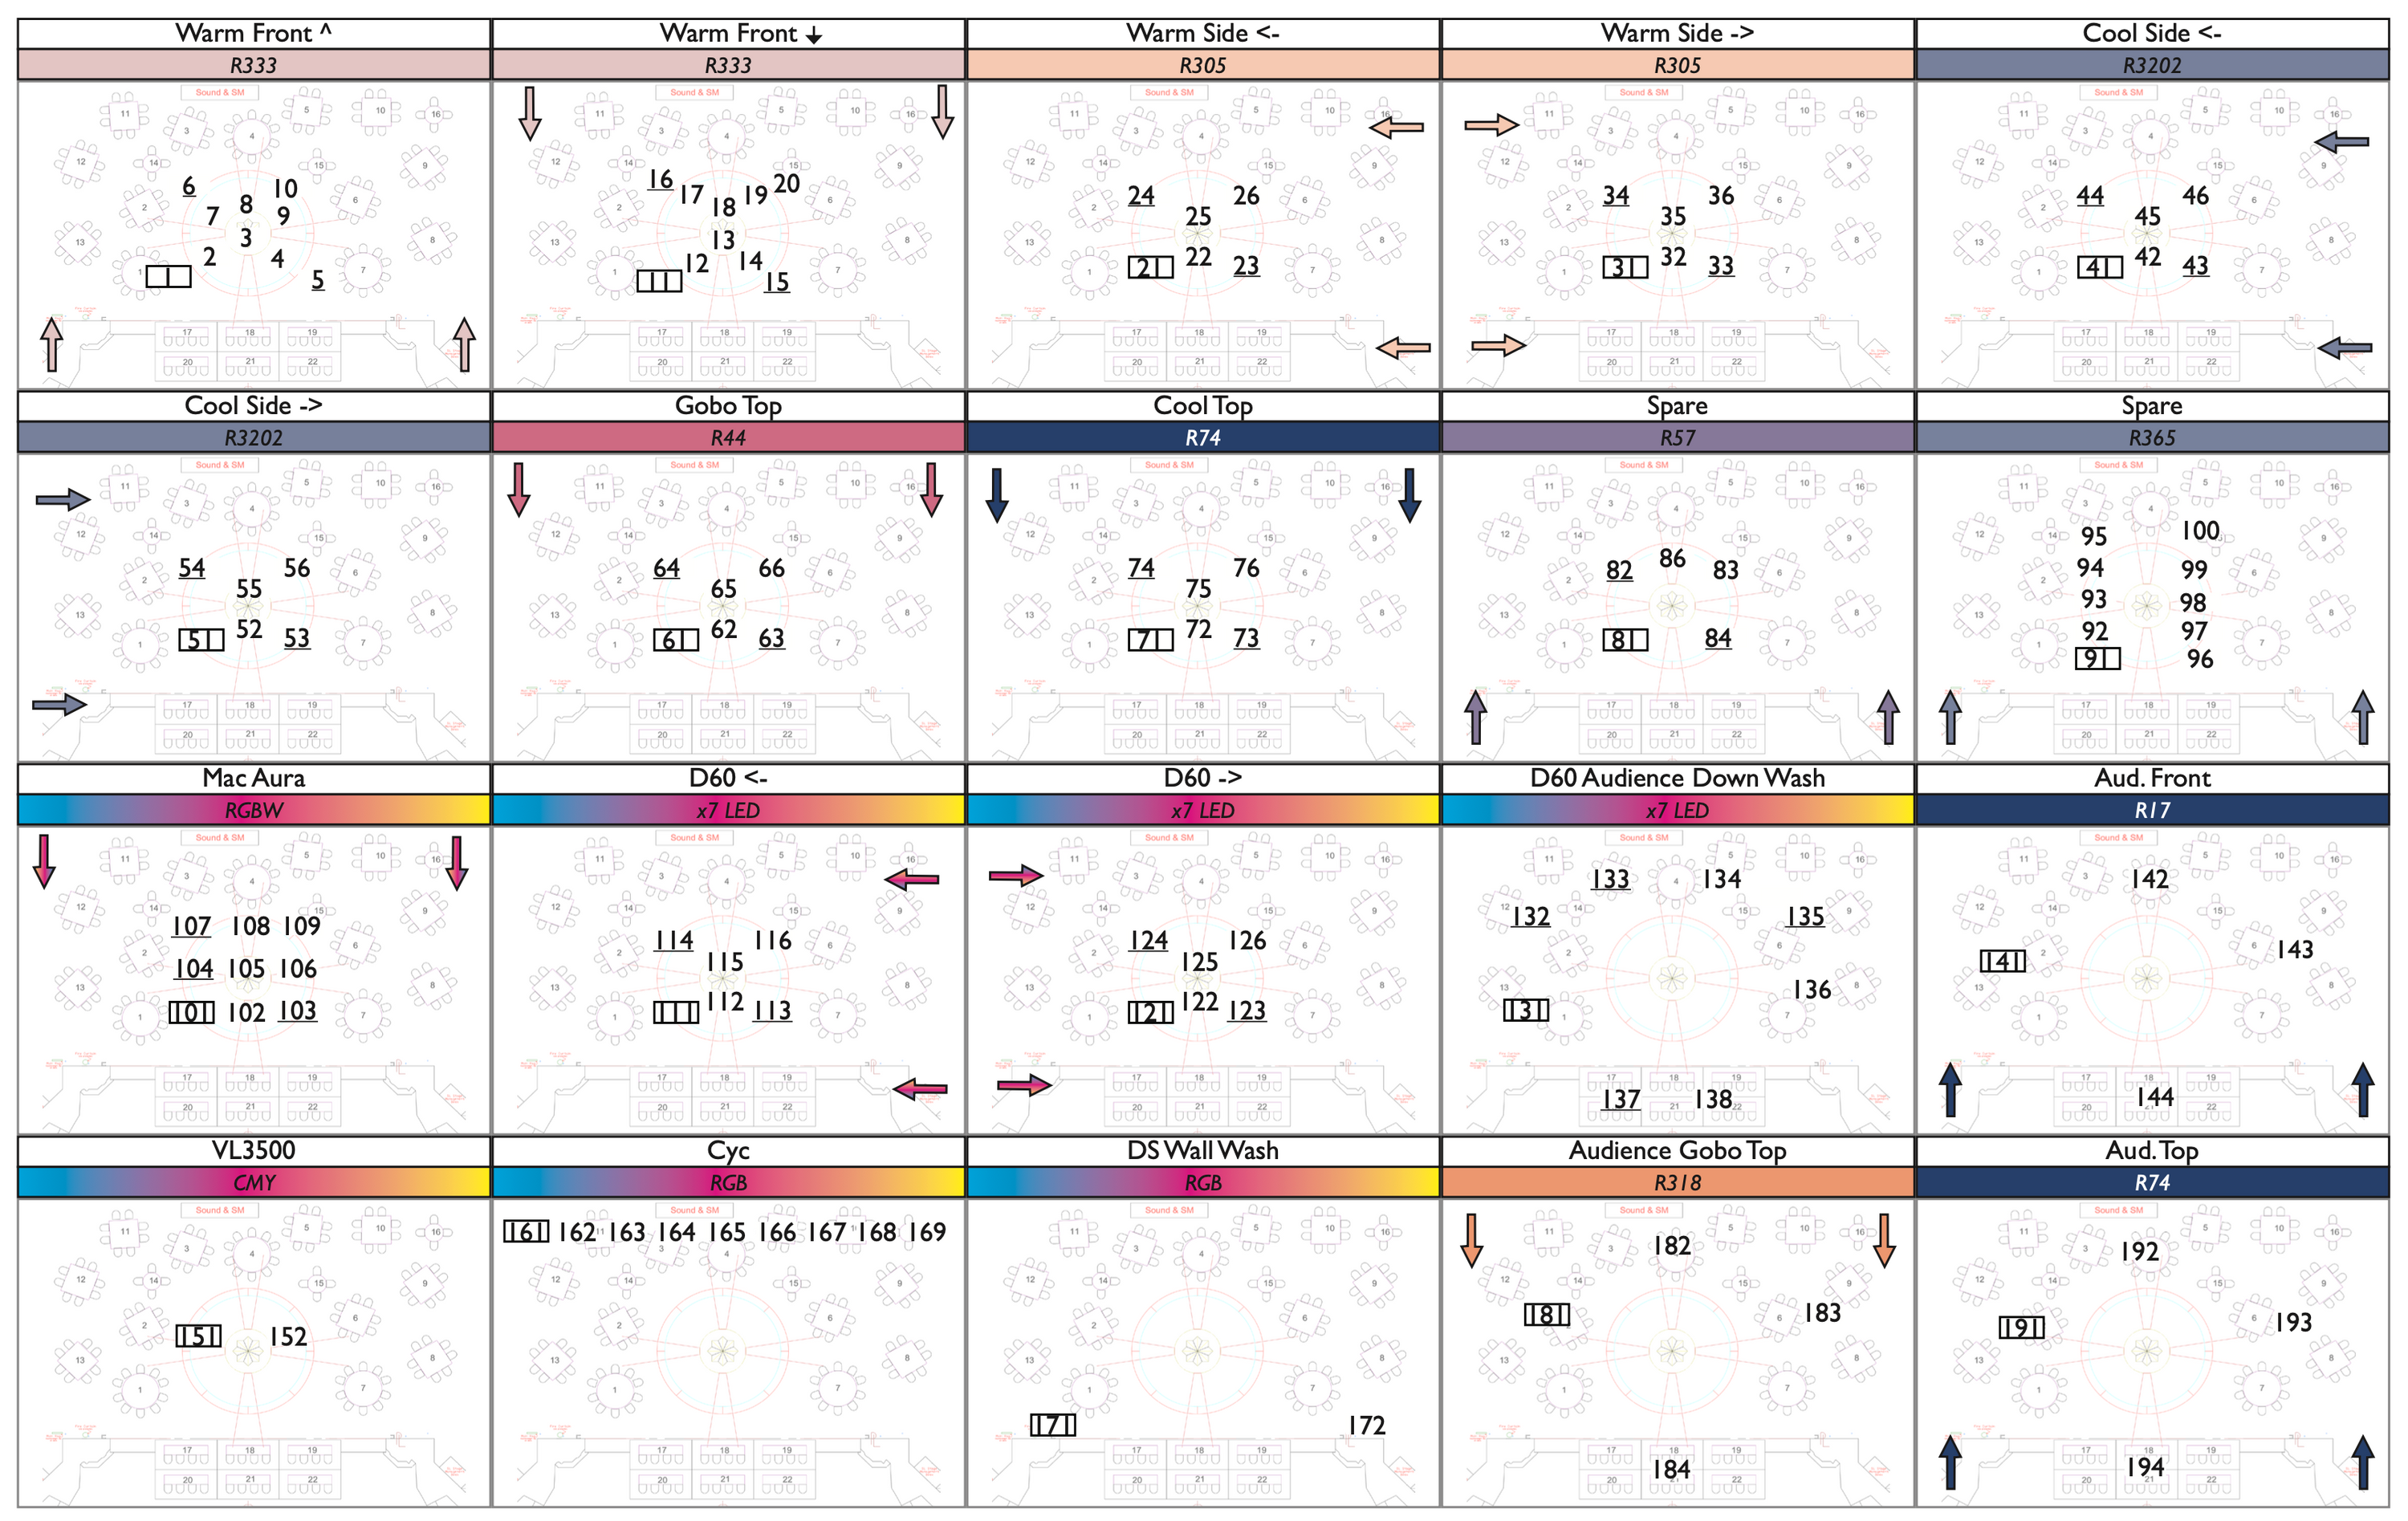 Magic sheet from the 2022 Fundraising Gala at Virginia Stage Company
In my experience, the tedious part of laying out a magic sheet is creating all the “cells” and populating them with the relevant channel numbers. What unlocked the magic of magic sheets for me was the realization that it was relatively easy to automate the monotonous steps of creating a magic sheet. The data merge capabilities built into Adobe InDesign can be used to automatically fill in the channel numbers for each cell. In a previous position at a private high school in South Florida, one of my responsibilities was laying out and printing the playbills for our shows. During this time I became familiar with InDesign and learned how to use InDesign’s Data Merge feature to merge in bios submitted by the cast. Using InDesign’s data merge greatly reduces the amount of tedious work required to make attractive and functional magic sheets.
Limitations
A notable limitation of this process is that once you’ve merged in the channel number, system name, and color data into your new merged document, the magic sheet will require a moderate amount of manual cleanup. The cleanup requires both visual finessing and updating displayed colors.
Requirements
Let’s get the bad news out of the way up front. InDesign is absolutely required to follow the process I’ve described. Unfortunately, InDesign seems to be the only page layout application, that I’ve tried, that offers the style of data merge needed. Even Microsoft Word can’t really replicate this process due to how its mail merge functions work. In my experience, there’s no way in Word to have multiple records on a single page. Word will create a separate page for each cell of the magic sheet.
Assuming you have access to InDesign (I know…), the rest of the process is much less platform-dependent. Any spreadsheet application that can output a CSV in UTF-8 encoding should work. Of note, I have run into weird encoding format inconsistencies with Apple’s Numbers application. My strong recommendation is to use either Microsoft Excel or Google Sheets for creating your data source that will be merged into your magic sheet.
The Process
Here’s the process I follow when creating my printed magic sheets: (TL;DR at the bottom)
Step 0
This is a pre-requisite but it’s worth mentioning. You need to at least have a partially completed design. At the bare minimum, you need to at least know what your channeling structure will be. I prefer to print out a channel hookup from Lightwright that I’ll follow along with to make sure I don’t skip any systems or channel numbers.
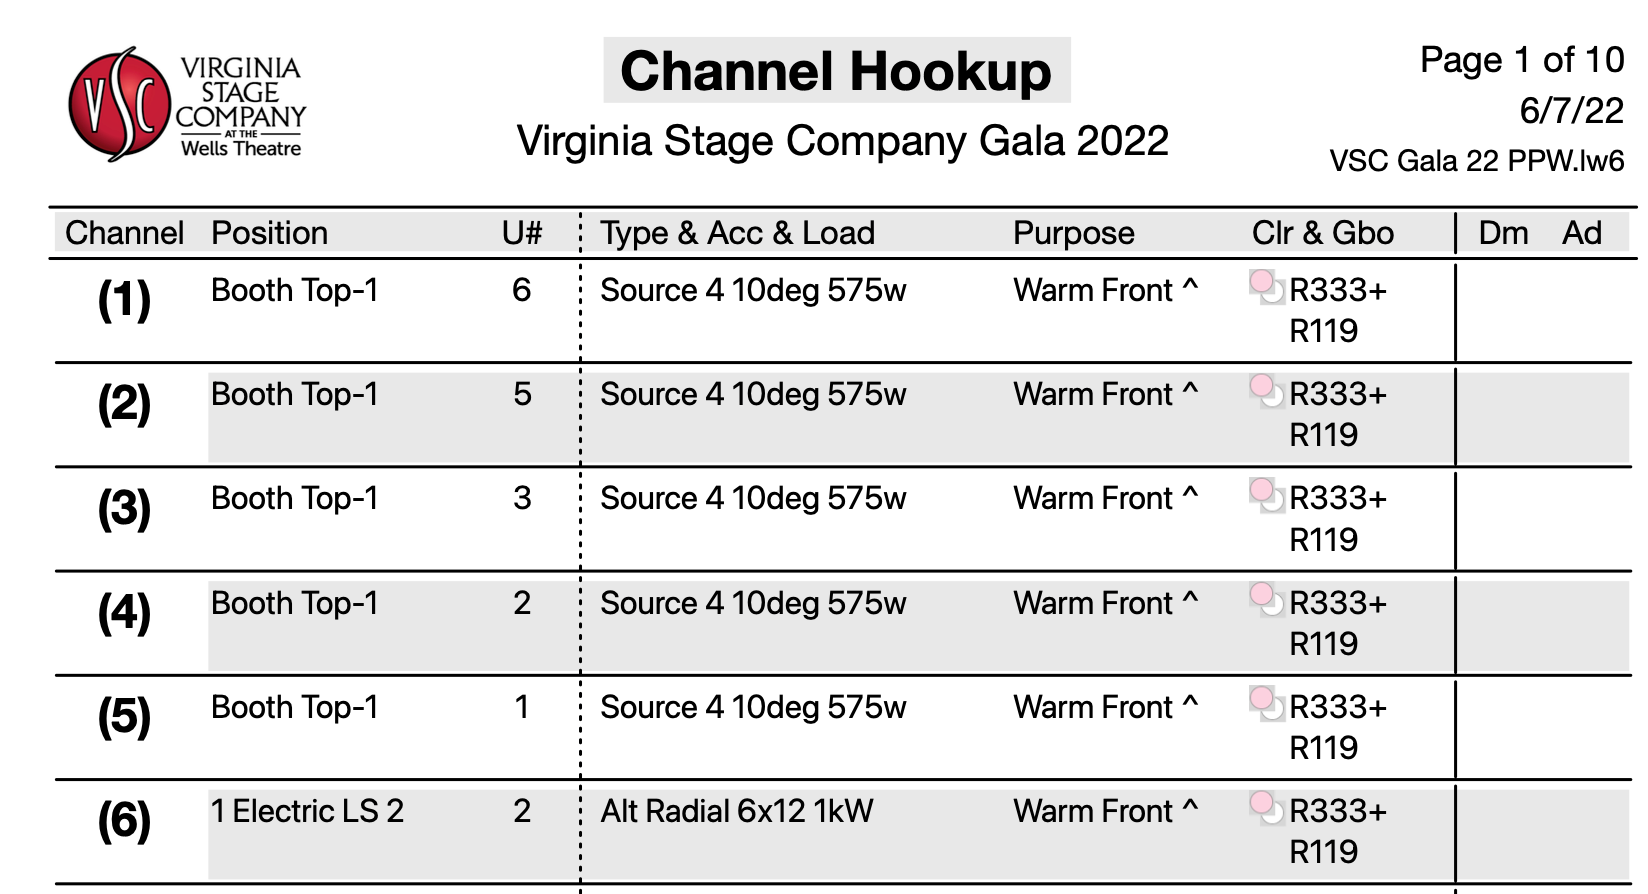 Channel Hookup Example
Step 1 - Creating the Data Source
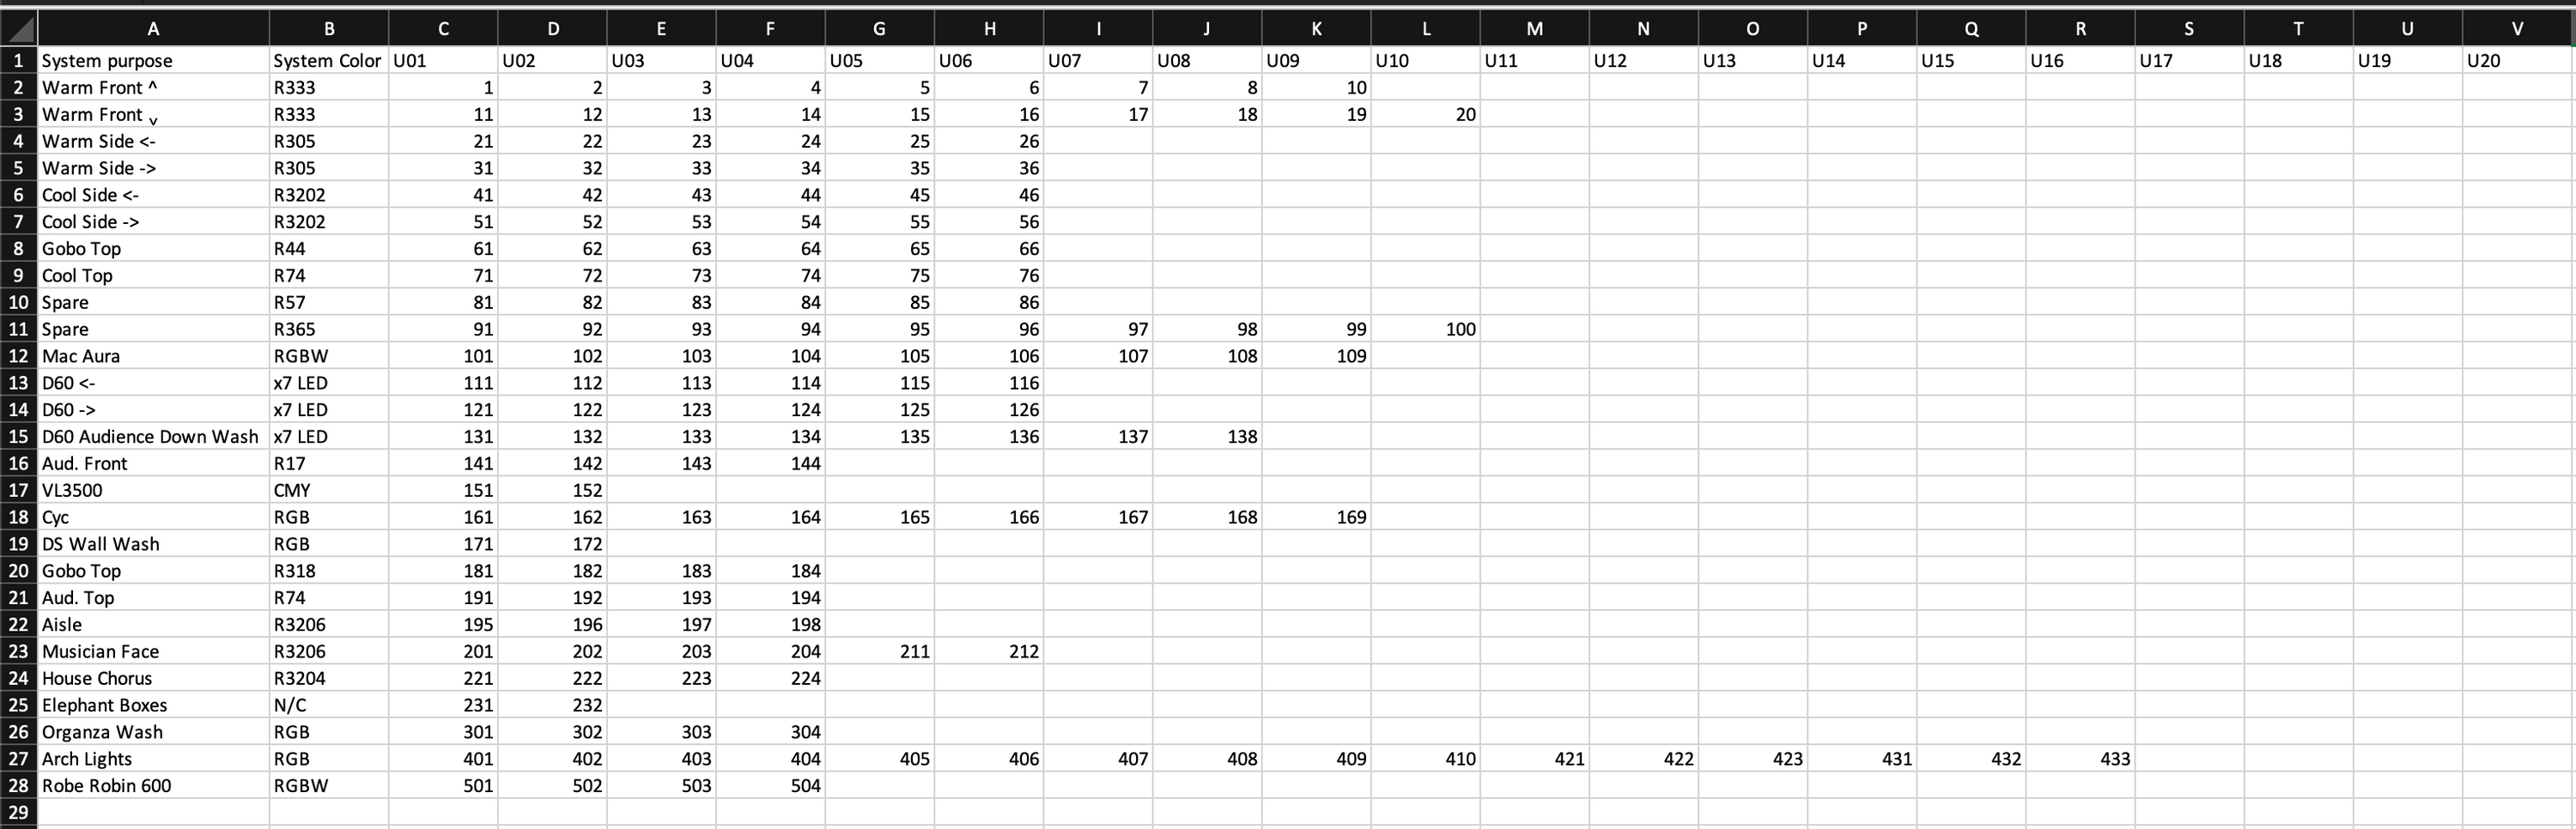 Excel data source example
Step one is quite straightforward. You will need to create a spreadsheet containing all the data you’ll be merging into the magic sheet. Each row of the spreadsheet will contain the data for one cell of your magic sheet. The columns I typically include are System Purpose, System Color, and a column for every possible unit within a system. e.g., U1, U2… up to however many lighting areas I have in the design. In the example above, the first row is for the front light system, with R333 as the color, and with channels 1-10.
Your column titles will be what InDesign inserts into your document when you create the template that will serve as the base layout. I strongly recommend that you use a three-character heading for the channel columns that way you can more easily see what the final layout will look like.
One quick excel tip: you can save time inputting data by entering the first two channel numbers for the system and use excel’s data fill function. Highlight the two cells and drag from the bottom right corner to fill in the rest of the cells.
 Click on the lower right corner of the green selection box
 Drag out however many cells you need for the system
Step 2 - Exporting the Data
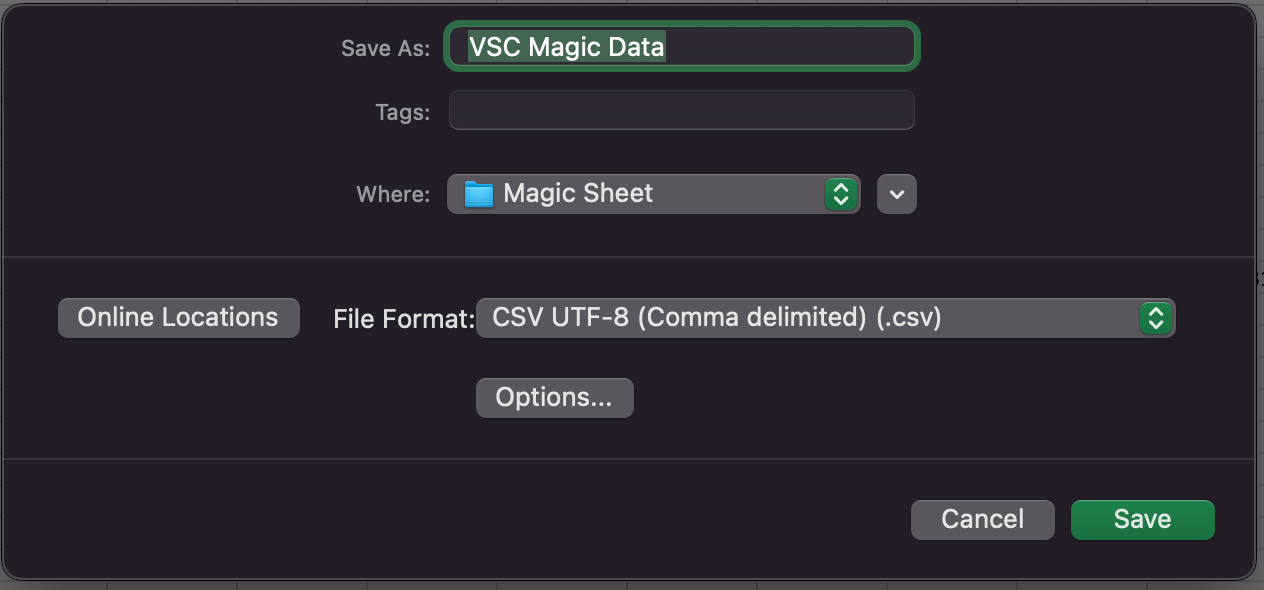 Excel CSV UTF-8 export window
The next step is to export your spreadsheet as a CSV (comma separated values) file. To do this in Excel, go to File-> Save As and change the file format from Excel Workbook to CSV UTF-8. The UTF-8 encoding is critical for InDesign to read the file correctly. Once you’ve saved the CSV file, it’s time to move over to InDesign.
Step 3 - Creating the Template File
This step is where the rubber meets the road. The exact details of creating your template file are dependent on your own personal style, but I will outline how I approach it below.
Page Setup
I prefer 11”x17” paper in landscape orientation largely because I have access to a printer capable of printing at that size. If you don’t, 8.5”x11” is perfectly fine. InDesign will also let you set up a spread of two standard letter sizes and you can tape them together after printing.
Cell Layout
 Example of cell template layout
At this point, you need to lay out a prototype cell in your preferred style. This cell will serve as the template and will be repeated for each system on your magic sheet. If you’re unfamiliar with InDesign, here’s a basic rundown of the steps necessary to re-create what I’ve made.
If you don’t already have an image file of your scenic ground plan or other desired background, grab or create one now. Taking a screenshot of the scenic ground plan PDF file is probably sufficient due to the comparatively small print size of the image.
Using the rectangle tool (highlighted in red below) create the outside border for the lower section of your cell. For reference, mine is roughly 3” x 2”.
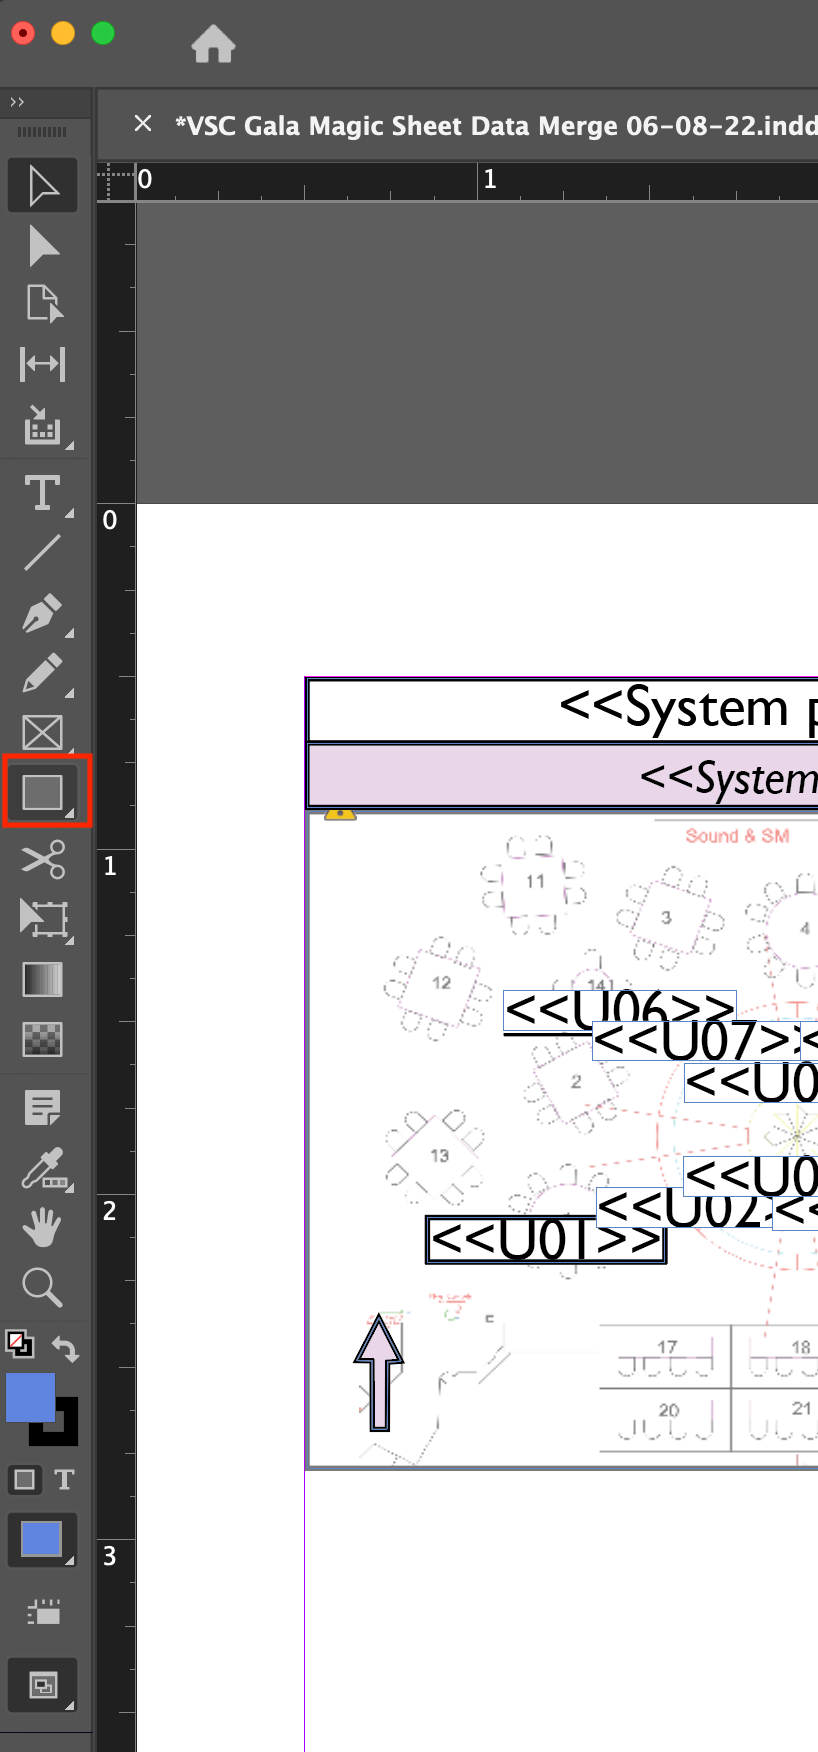 Square frame tool close up
You can now insert your ground plan or other background image into the rectangle frame. You can either drag and drop the image onto the frame or with the frame highlighted select File-> Place (⌘+D/Control+D).
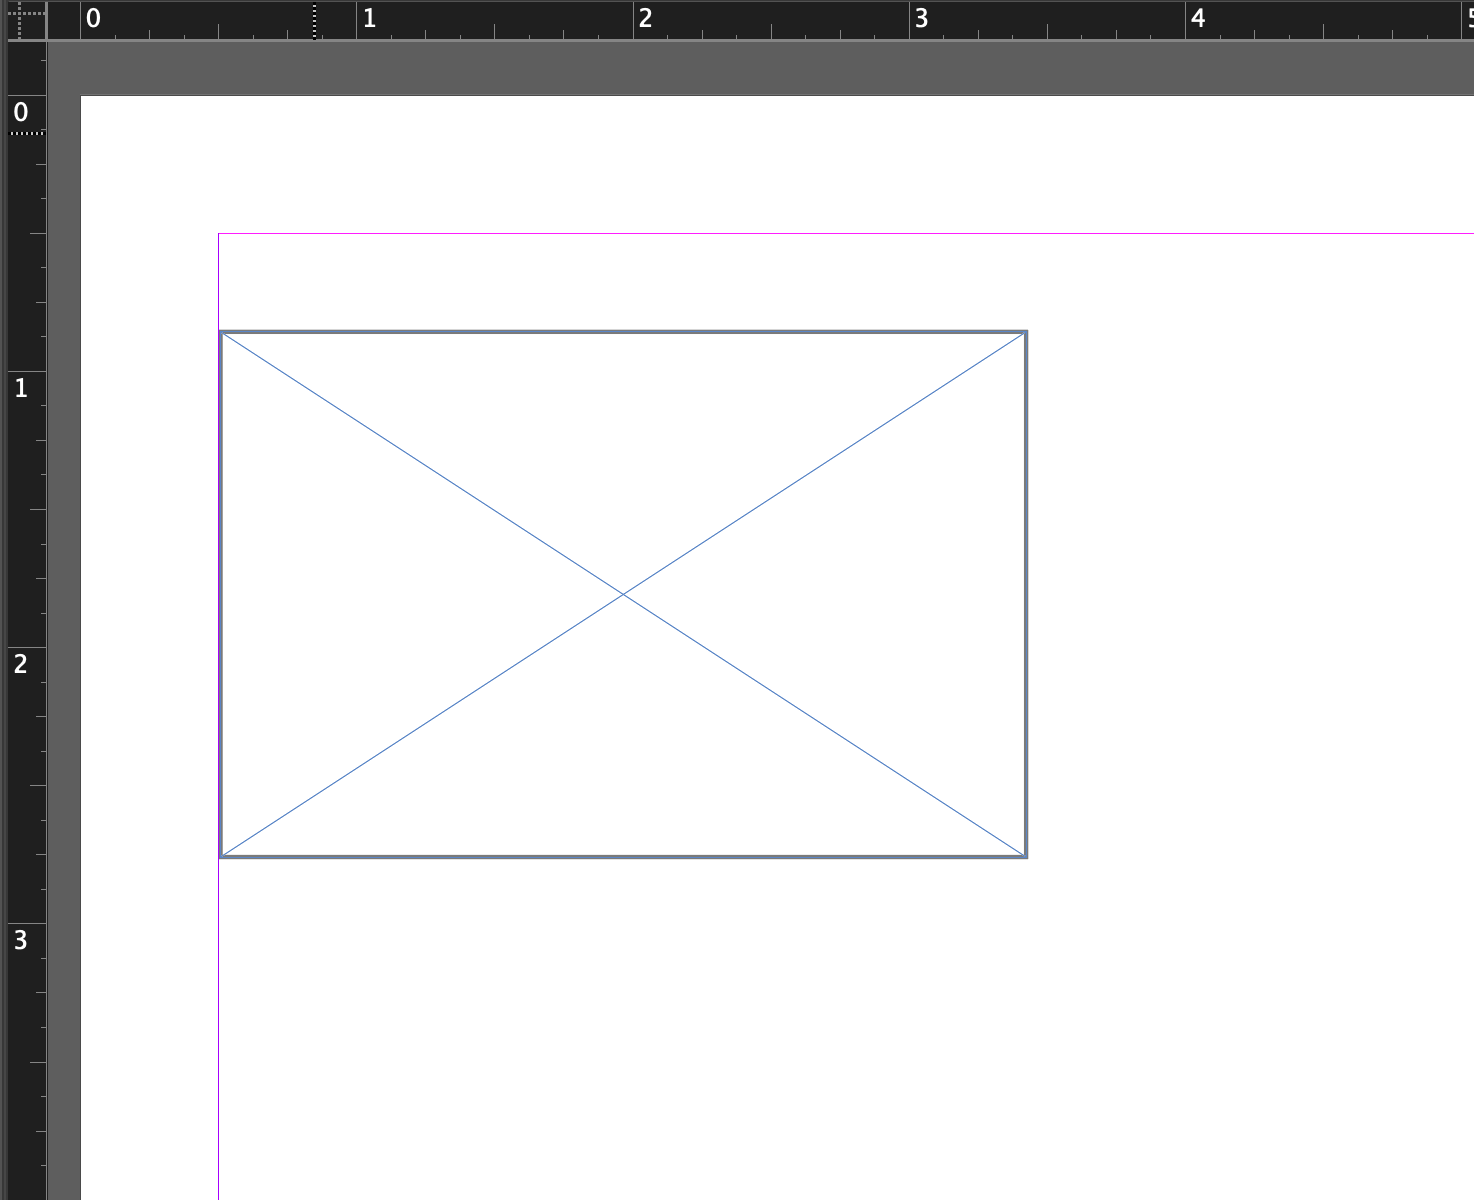 Square frame drawn on the document
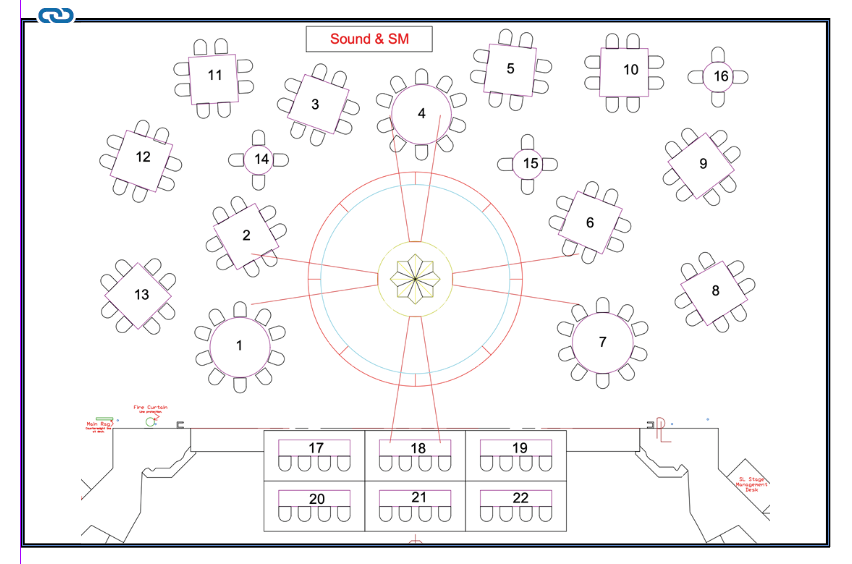 Square frame with groundplan placed
Next, create two more rectangular frames above your ground plan frame. These will be your System Title and Color fields. To insert text into your frames, double-click on them with the Text tool selected (it’s in the basic tools represented by a large T). You should also take the time now to format the text to your preferred style. I like to use Gill Sans as the typeface for my magic sheets.
 Cell close up with ground-plan, system name, and system color
 Cell with properties window
Now you can create all the text frames that will contain your individual channels. Take care here to format them how you want them to be displayed in every cell. I suggest that you use center justification for these fields. Additionally, in the text frame options, set the fields to auto-size. This will automatically re-size the frames to match the size of your text, e.g. 1 versus 101. Checking the “No Line Breaks” box is also a good idea.
 Text frame options button
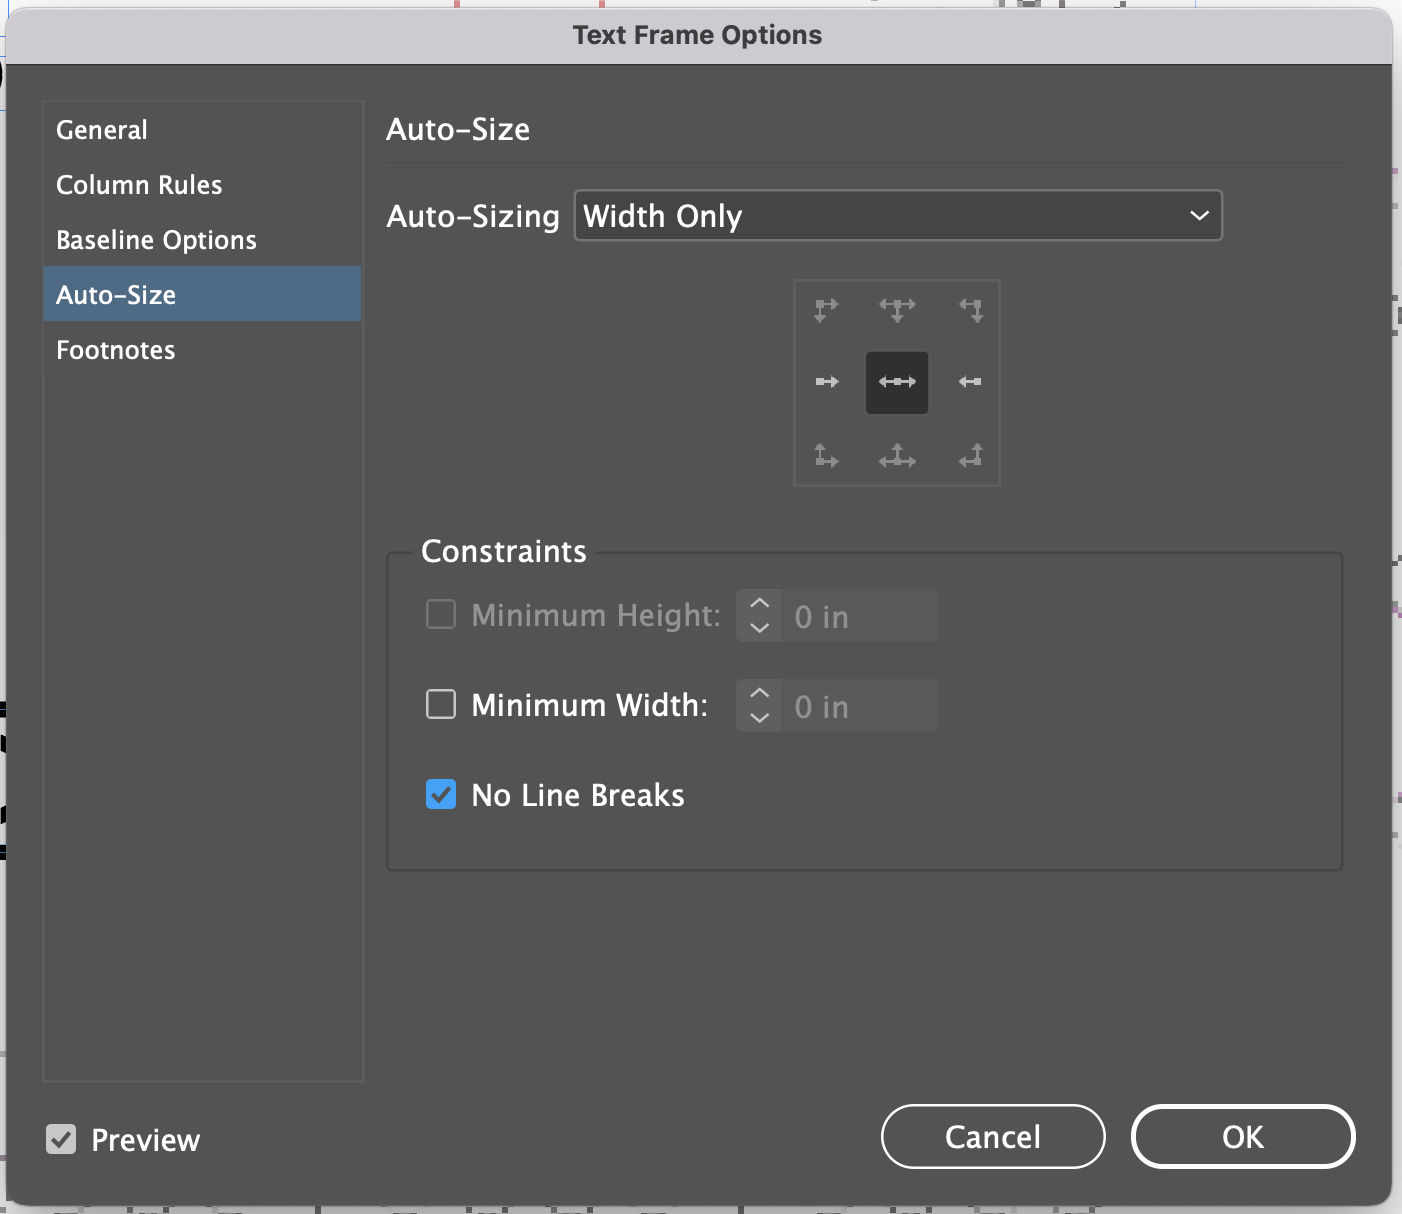 Text frame options window
By now, your typical cell should be complete and we’re ready to proceed to the data merge. The data merge panel we need is hidden in the default user interface layout. To open it, go to Window->Utilities->Data Merge to open the panel.
Here’s the flow we’re setting up: select a data source, drag your fields into their respective places, and then run the merge operation.
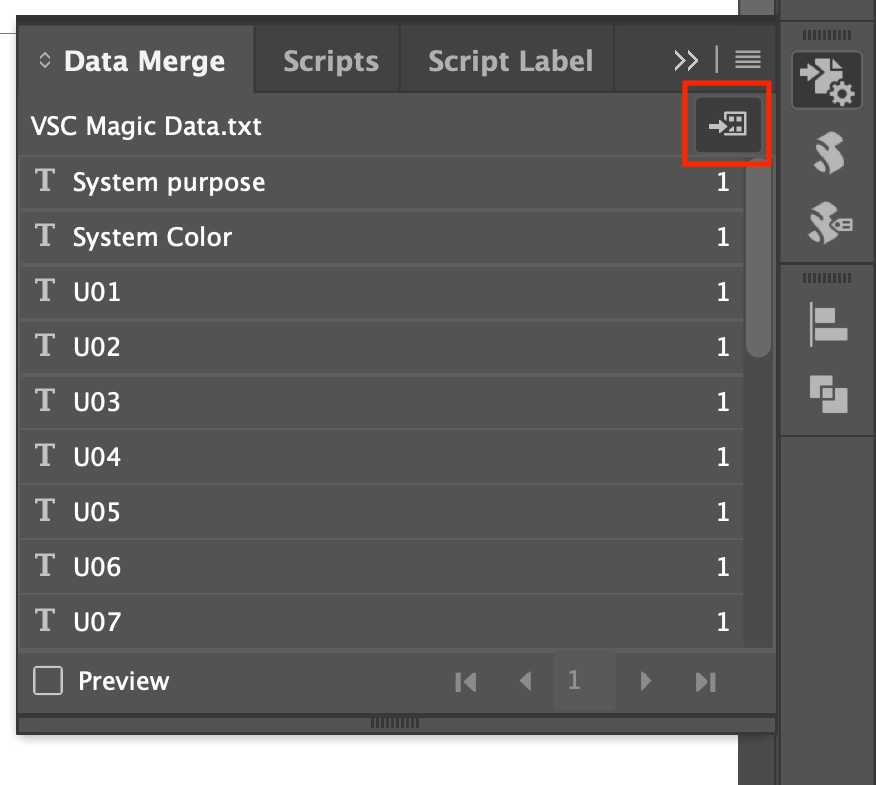
 Data merge panel
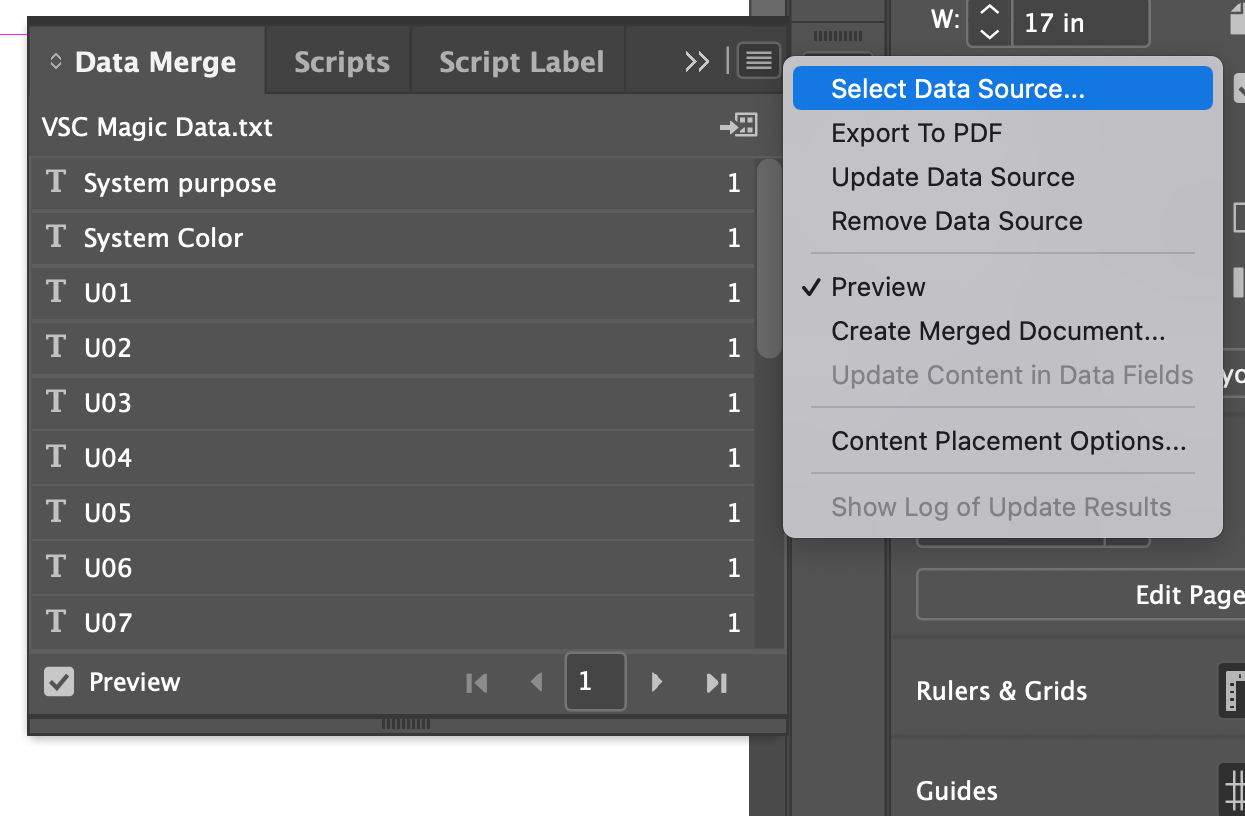
To select the data source, click on the four-line “hamburger” menu at the top right of the data merge panel and then click on Select Data Source… and choose your exported CSV file. Once your CSV file is selected you’ll see all your column headings in the data merge panel. To finish setting up the merge, select the relevant text in your prototype cell and drag and drop the column heading into its place. I’ve had better success keeping my formatting by highlighting the already formatted placeholder text in my prototype cell before dragging the column heading into place.
Inserting data merge tags into cell text frames
Once you’ve dragged all the column headings into place, your prototype cell should look something like the image below.
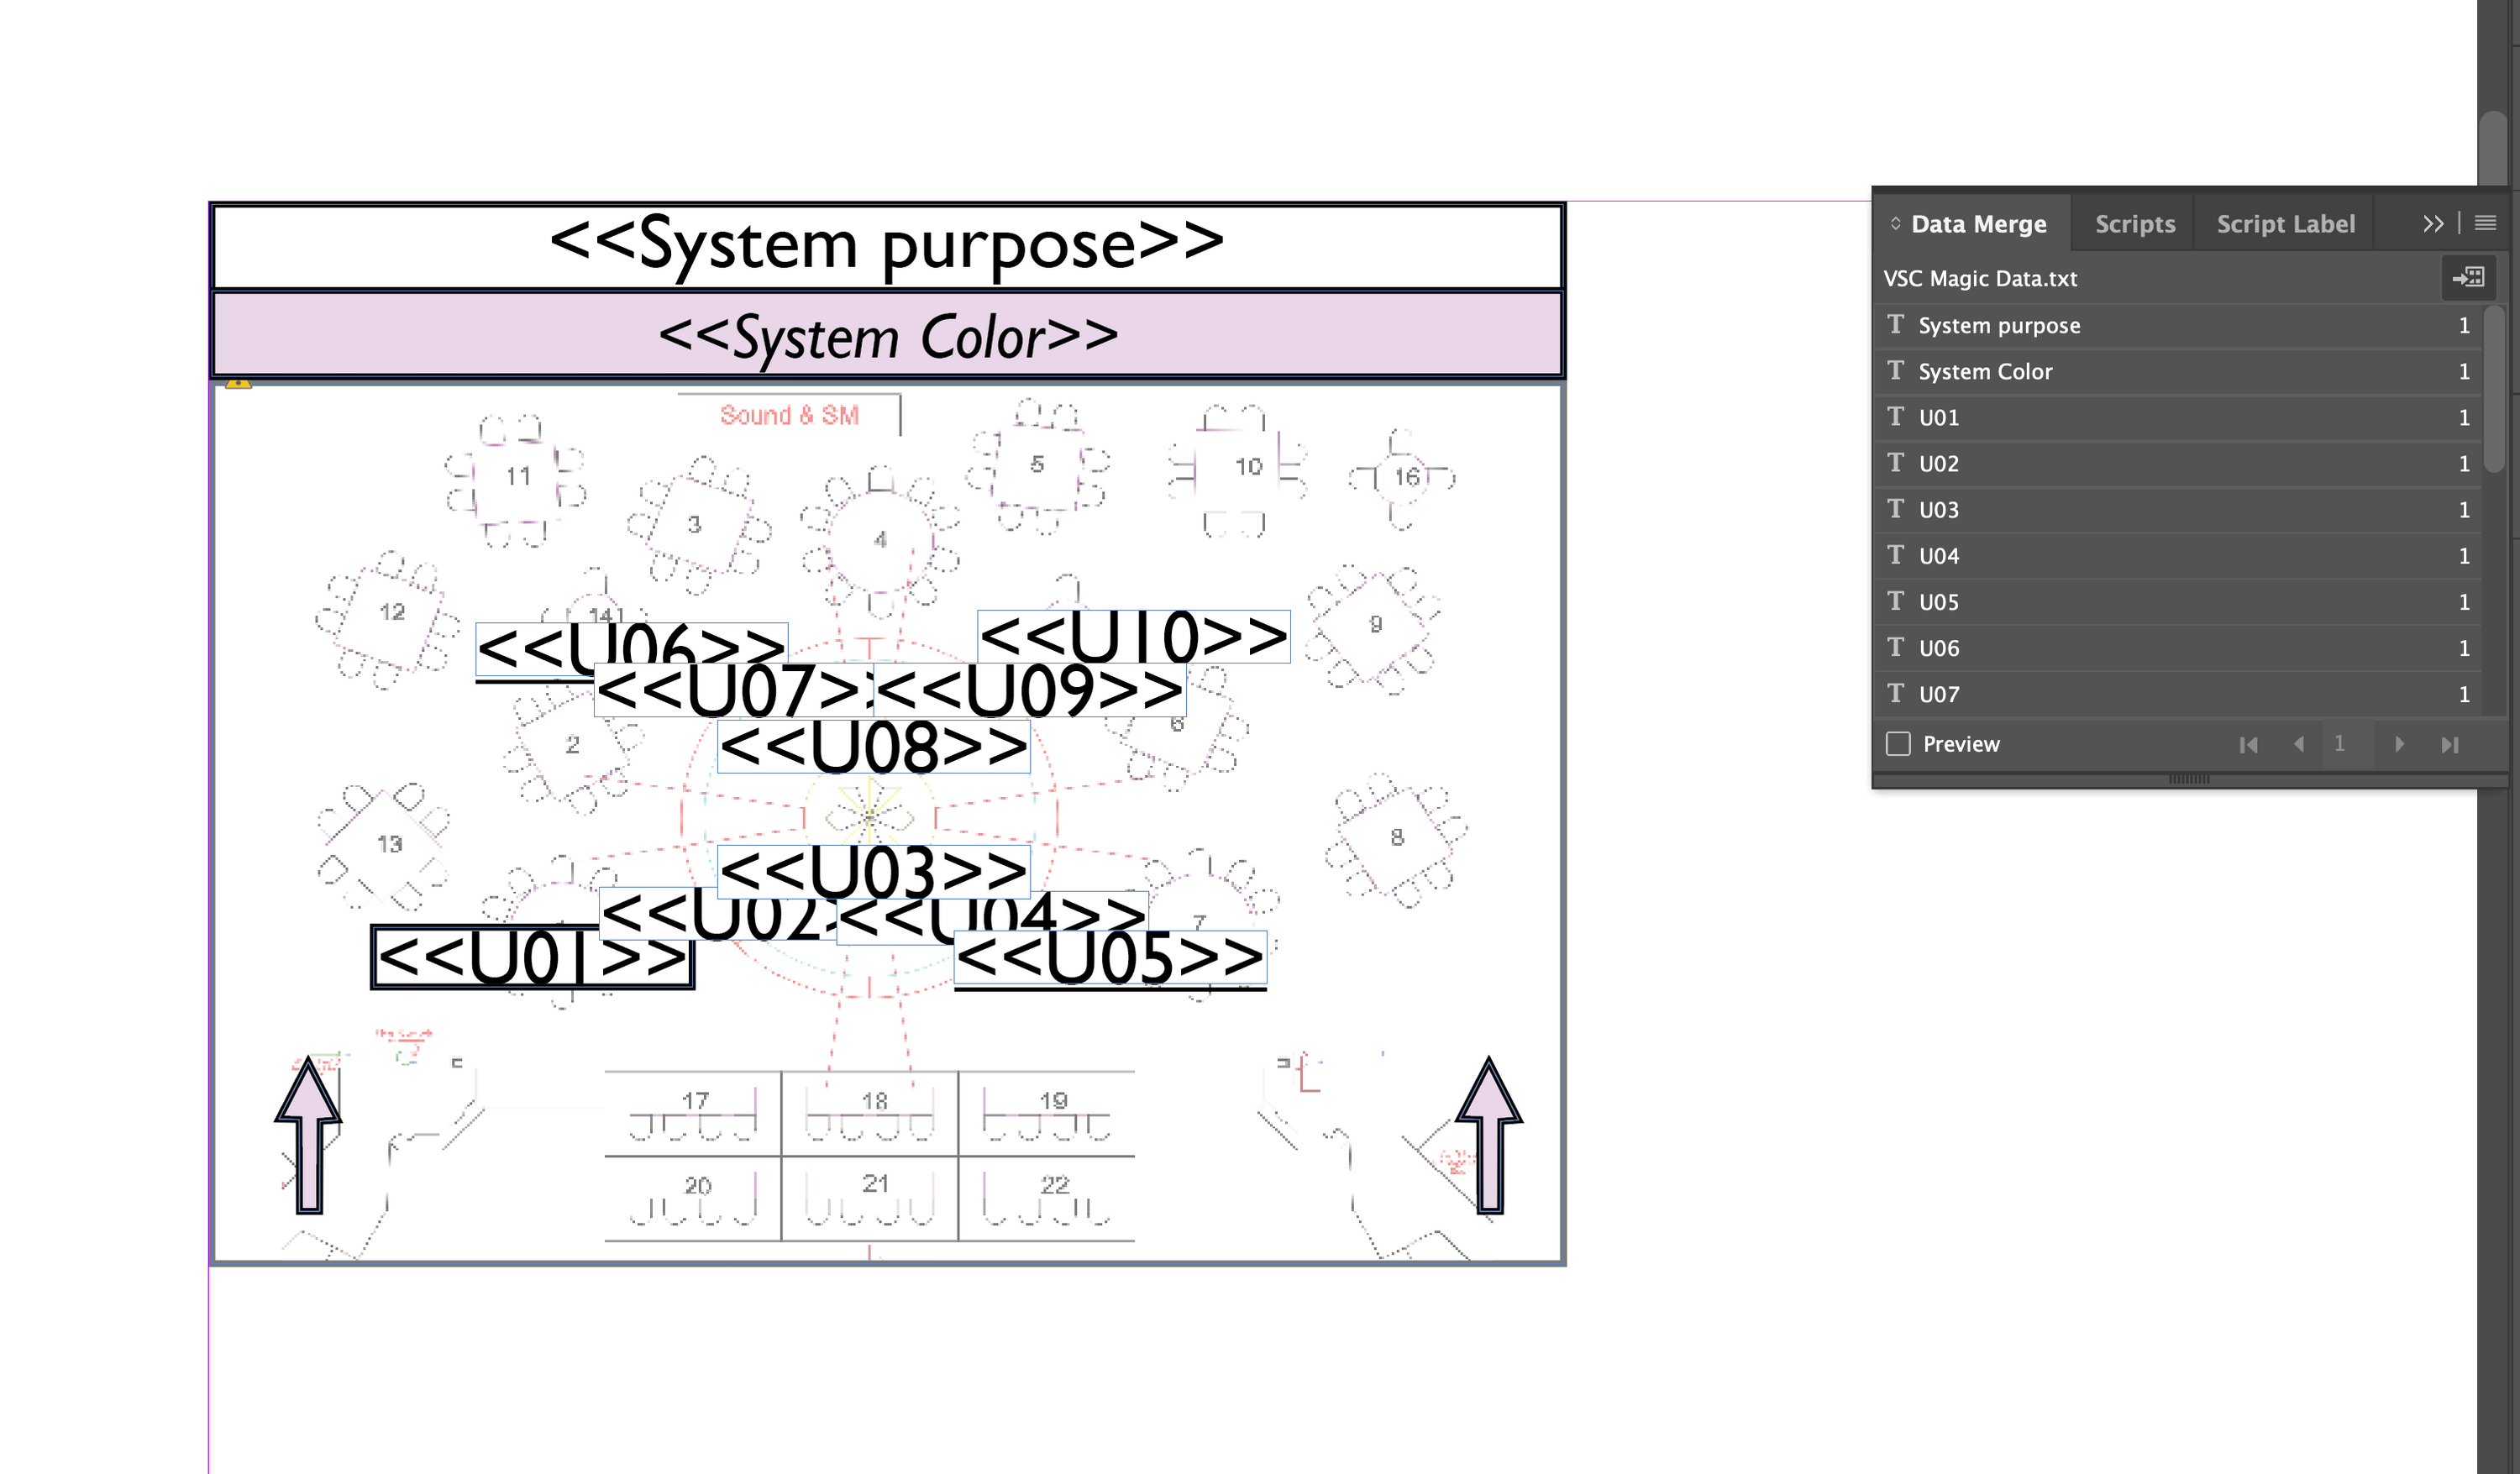 Cell with completed data merge tags
Now you’re finally ready to execute the data merge! Click the icon with an arrow pointing at a page with four cells on it (highlighted in red below).
 Data merge execute button
There are many options available when you begin the data merge but only a few of them matter to this process. The critical option you must select is the “Records per Document Page:” drop down. By default, “single record” will be selected. This would create dozens of pages with only one cell on them, and obviously we don’t want that. Instead, select the “Multiple Records” option.
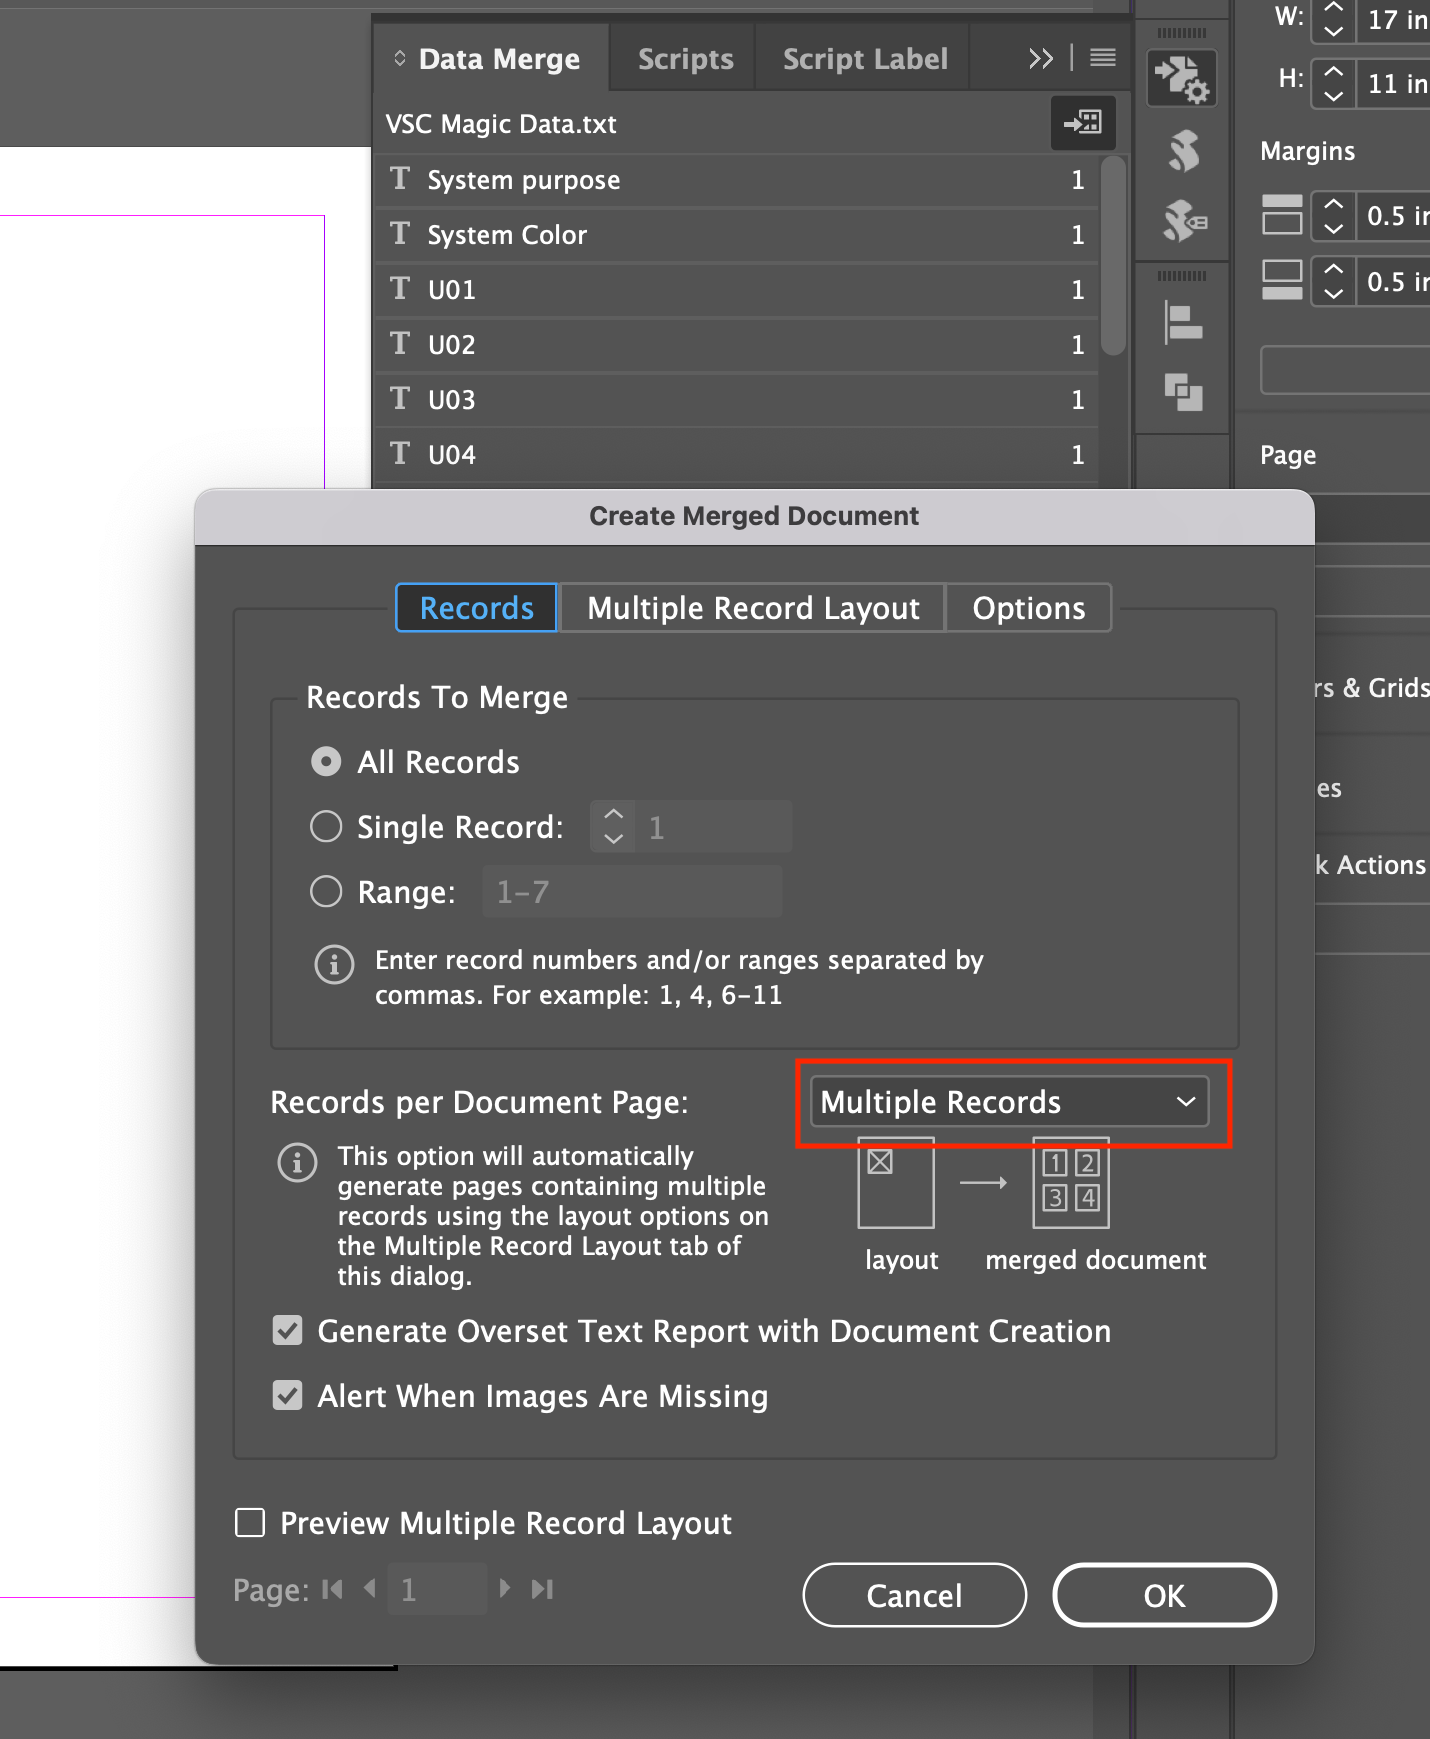 Create Merged Document window with multiple records selected
On the next tab over (labeled “Multiple Record Layout”) you’ll find layout and formatting options to adjust the margins, add space between cells, and adjust the layout direction (rows versus columns). The “Preview Multiple Record Layout” checkbox is helpful to make sure your magic sheet will look how you intend.
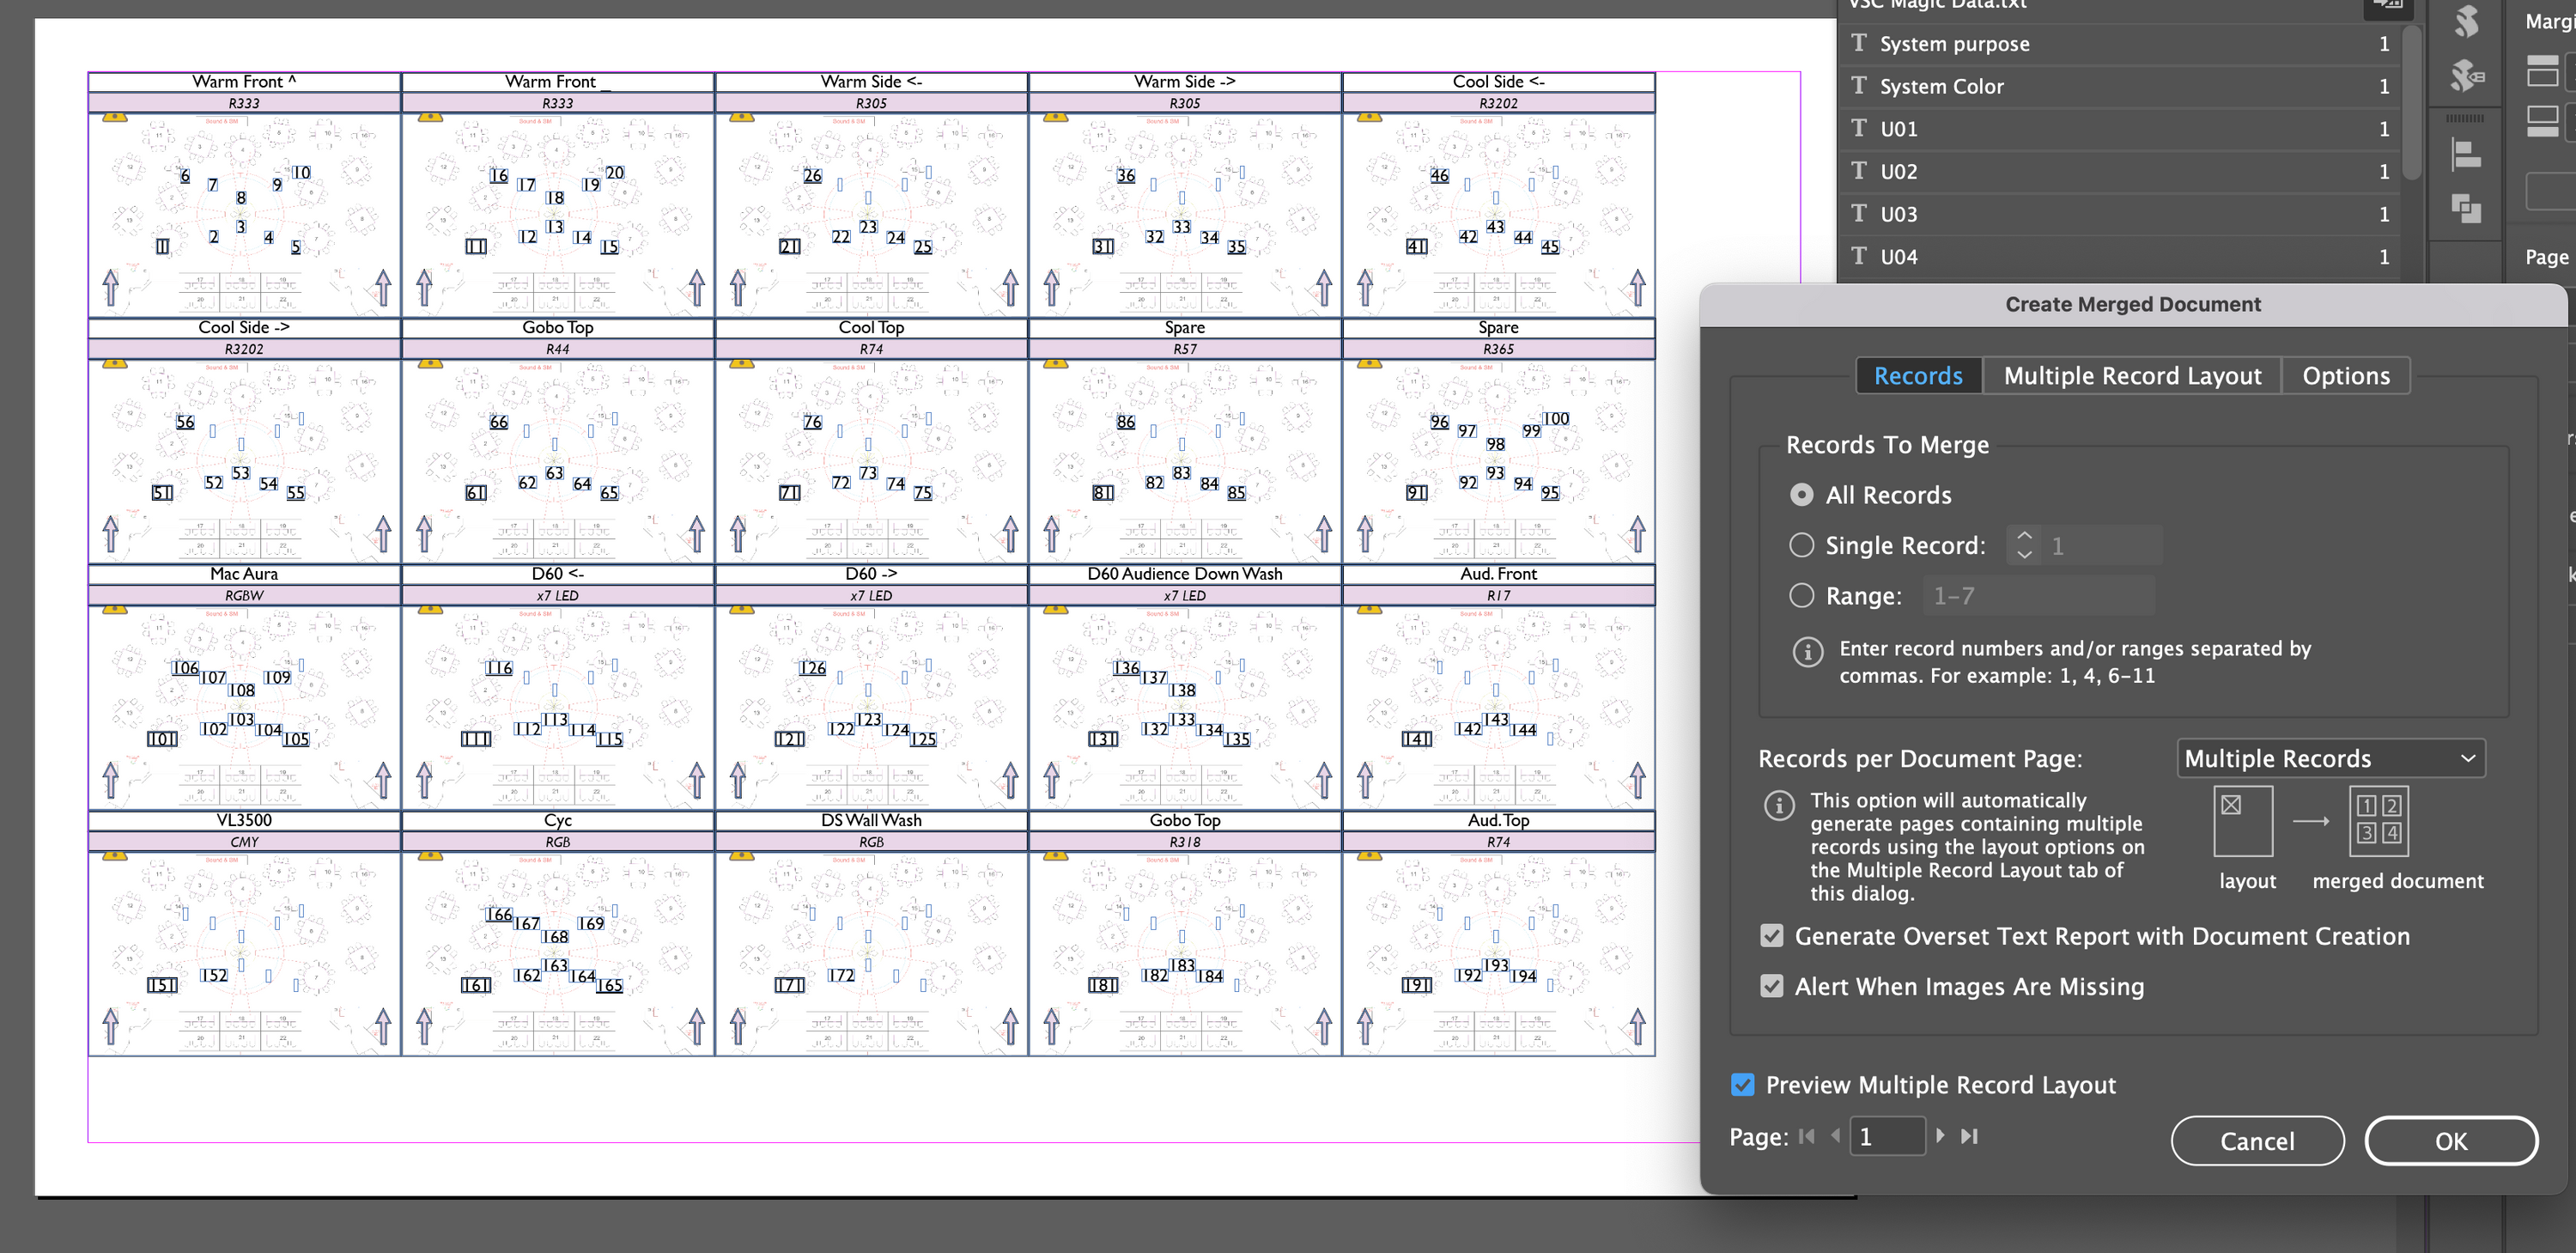 Merged document preview
Once you’re happy with how the layout looks, click “OK” and, assuming the merge worked properly, you’re ready to proceed to the final –and tedious– step of the process: the clean-up.
Step 4 - Cleanup
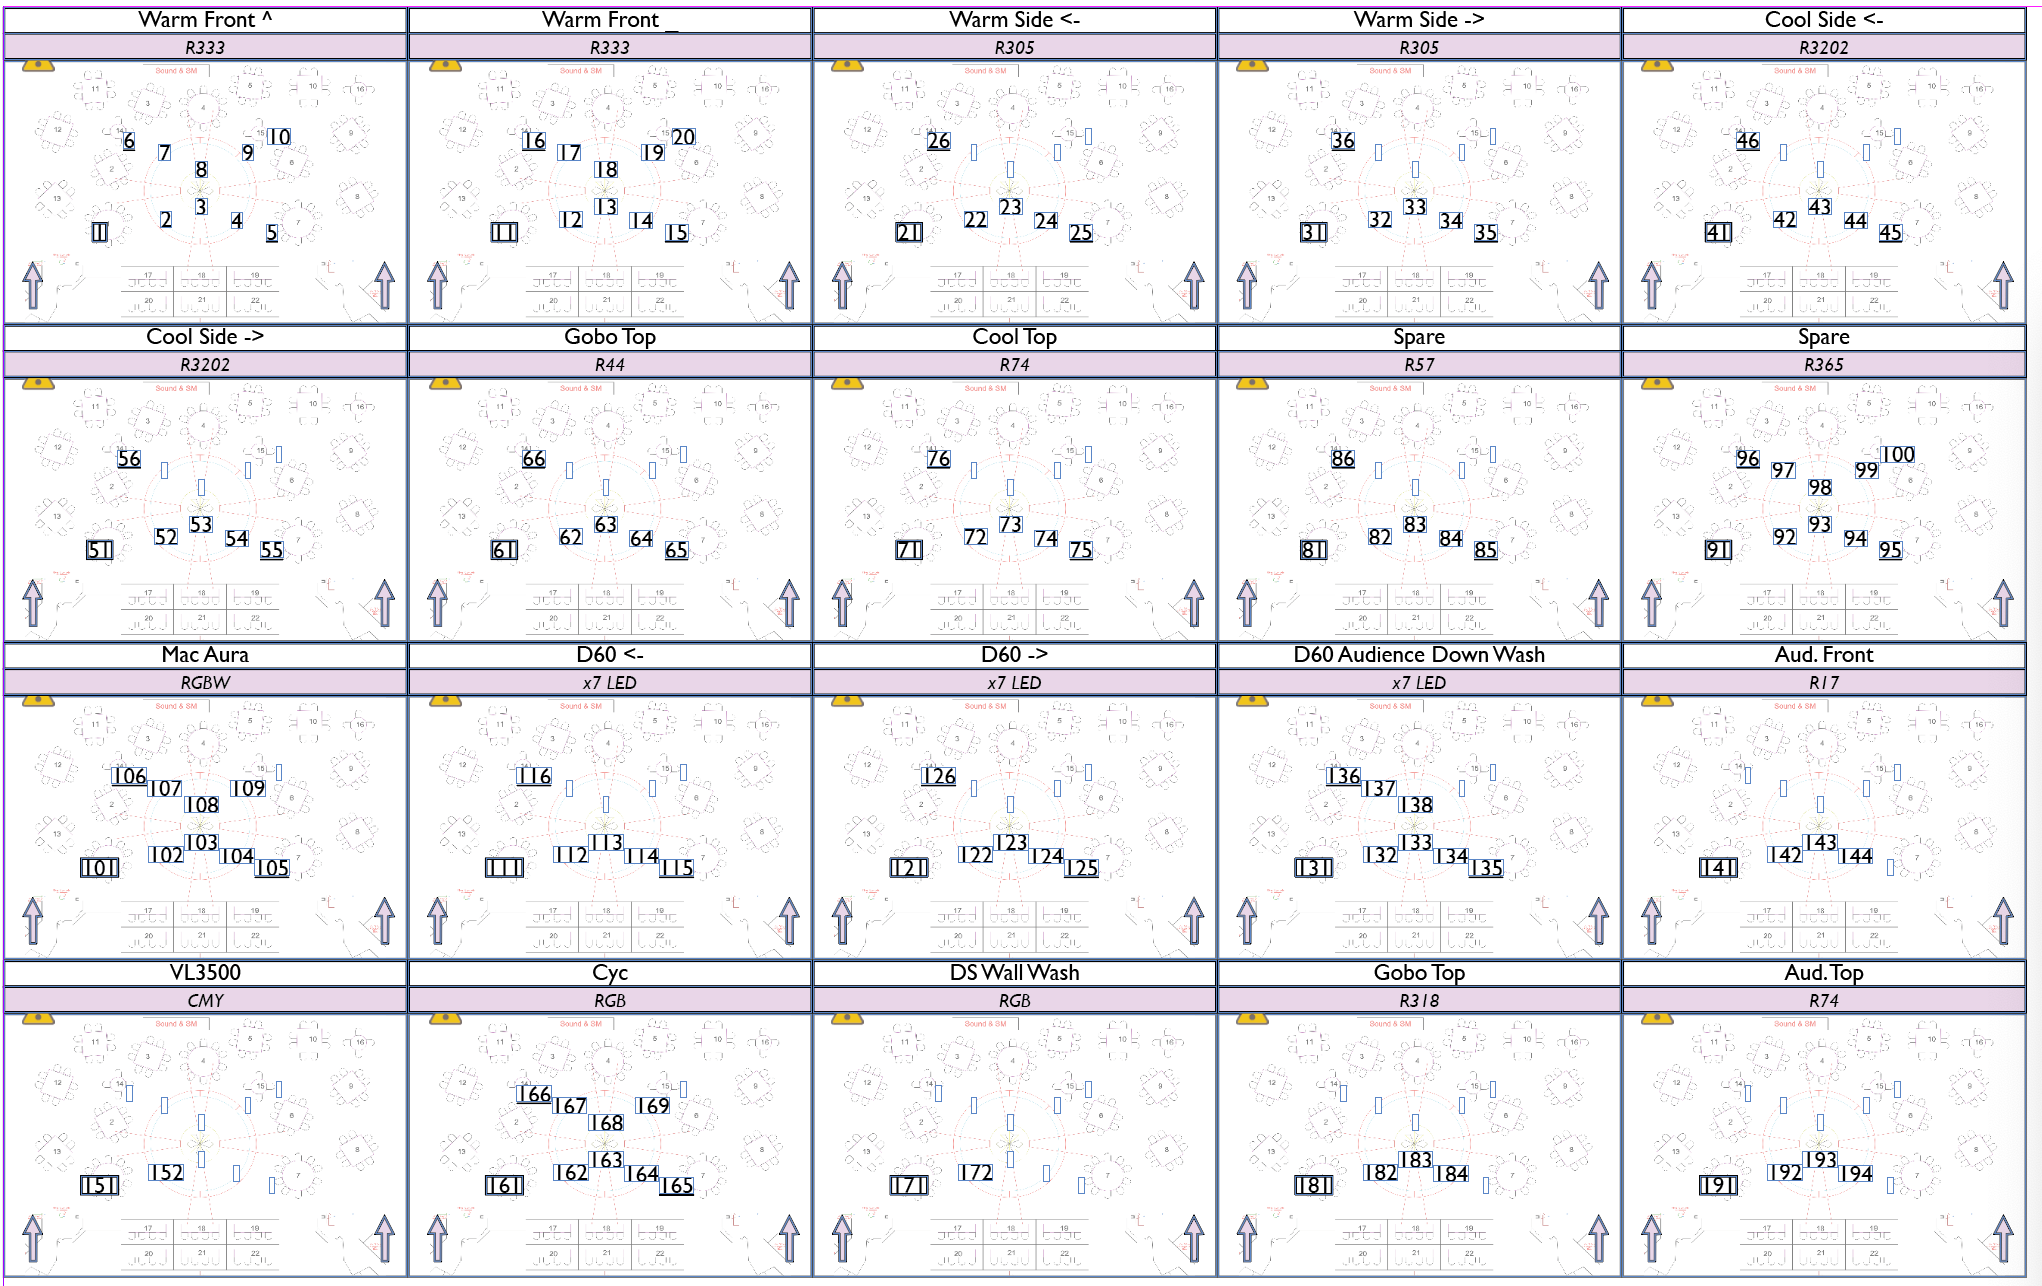 Fully merged magic sheet document
Now that all the data is in the document, all that remains is to clean up the layout and make minor updates. Here’s what I typically need to do:
- Move any special case systems into their correct location. My most common variation is twofer’d sidelights that follow an alternate arrangement of lighting areas.
- Adjust the System Title rectangle frame background colors to match their assigned gel color. Based on Mike Wood’s article, I also store color swatches in InDesign of the most common colors I use. See his article (linked at the top) for more information. For LEDs and other color mixing fixtures, I denote them with a rainbow gradient instead of single gel color. I also list the component colors of the fixture (RGBA, RGBW, CMY, etc.).
- Re-color and move system directional arrows to match the directionality of the corresponding system.
- I manually add any specials, gobo images, and color palettes on an as-need basis.
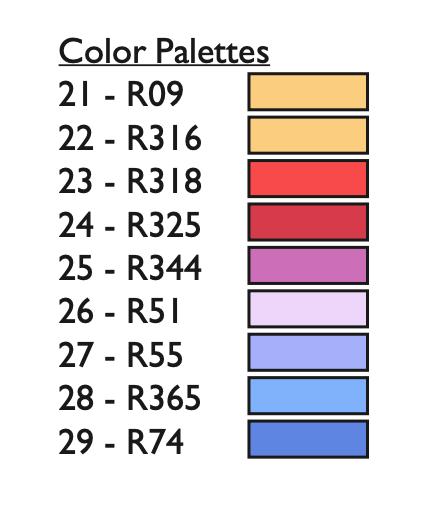 Color pallets example
Whenever you’re happy with how your magic sheet is looking, or perhaps more realistically, when you’re out of time, it’s time to export to PDF and print. You can print directly from InDesign but I’m personally more comfortable and familiar with printing using the macOS system print dialogue.
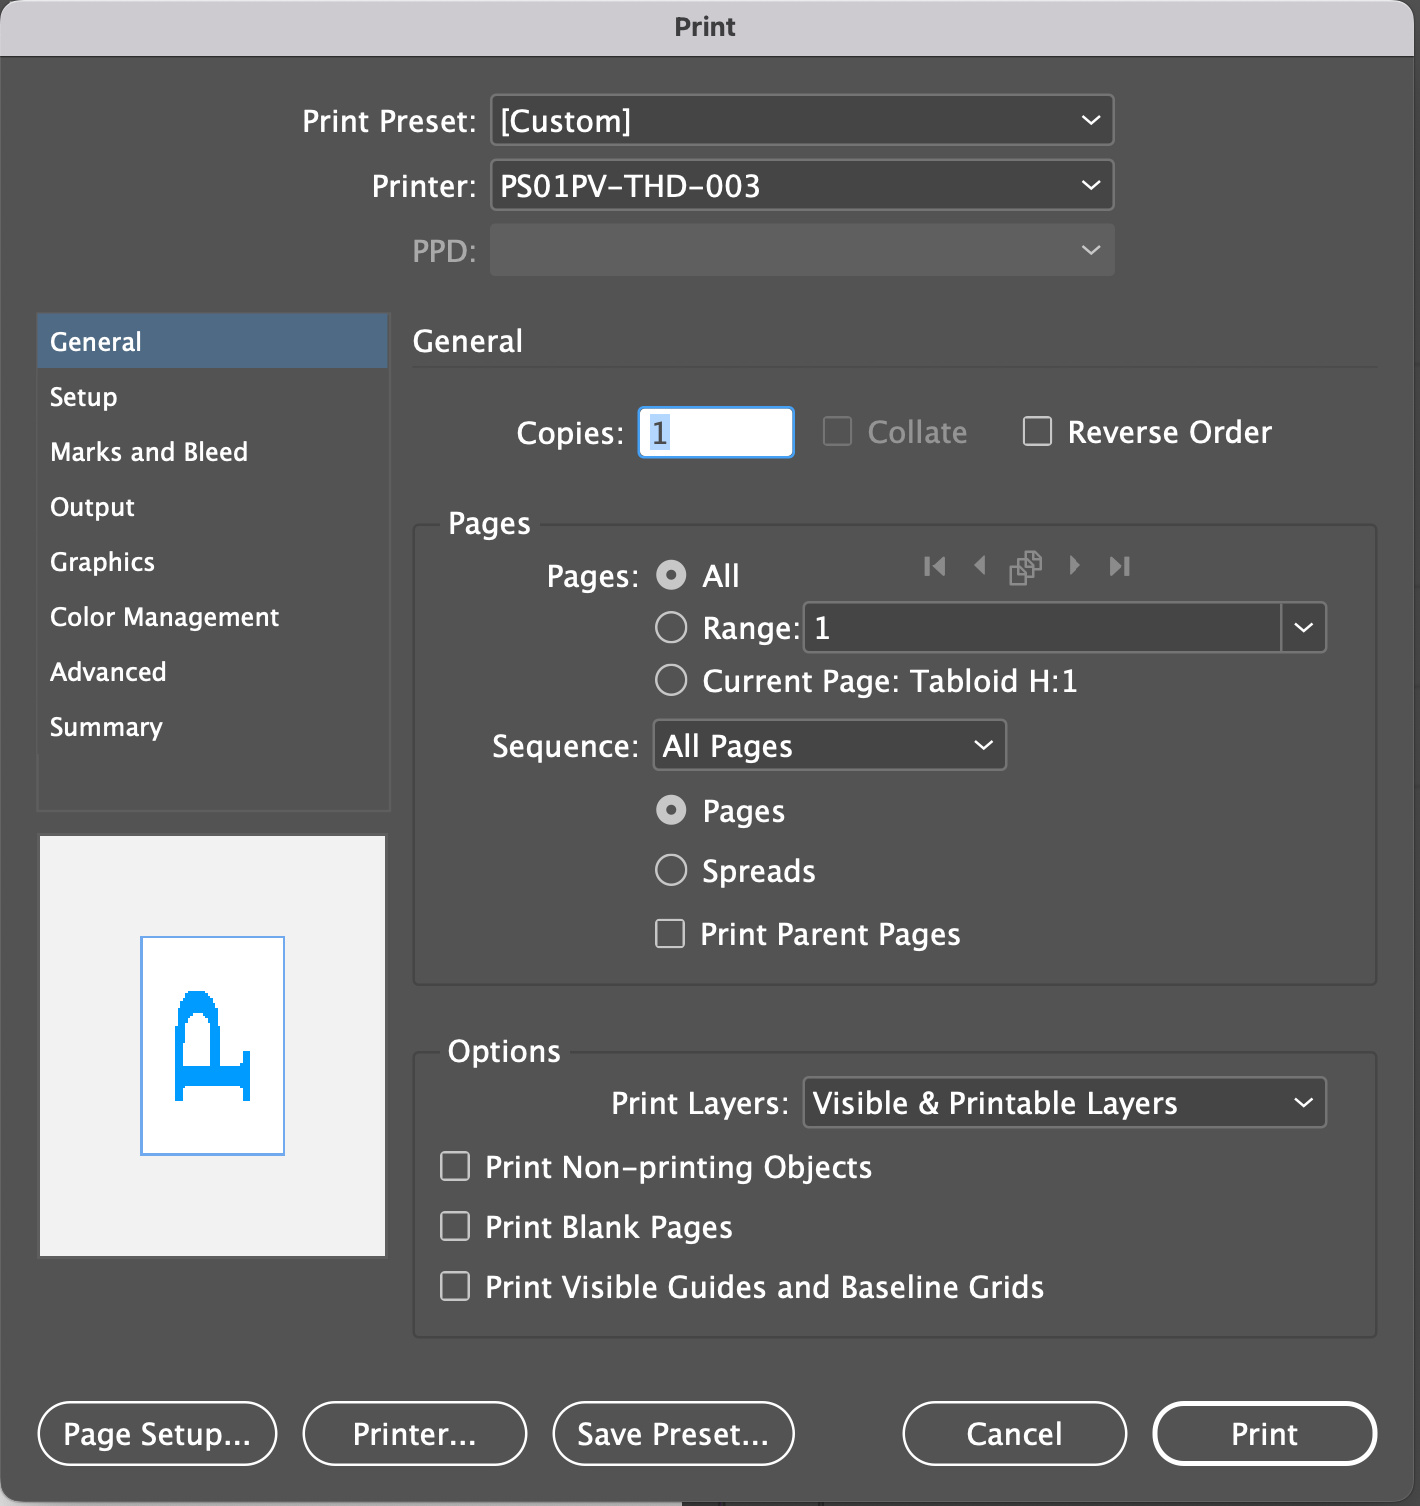 Adobe print screen
Adobe makes it extremely simple to export a document to PDF within InDesign. In the file menu, select “Adobe PDF Presets” and my preferred preset is “High Quality Print”, but any of the presets should be of sufficient quality for our purposes. Once you’ve exported your PDF you’re ready to print it out and start calling focus or programming cues!
TL;DR
Step 0 - Design/Channel your show in Vectorworks and/or Lightwright. Step 1 - Create an excel spreadsheet.
- Rows for each system.
- Column headers should be short but descriptive (U1, U2,…) these are what you’ll see when setting up the data merge.
Step 2 - Export the completed spreadsheet as a CSV file (UTF-8).
- File-> save as-> CSV format
Step 3 - Create InDesign file.
- Page Setup -> 11x17 Landscape.
- A single cell in a typical format.
- Format all text and graphics now because they will be repeated into every copy of the merge.
- Open Window -> Utilities -> Data Merge.
- Click hamburger menu -> Select data source.
- Highlight text in the destination frame and drag each field into the correct text frame.
- Once you’re happy with the fields and formats click the Create Merged Document button.
- In the dialogue box, set the options according to how you want your merged document to look (preview multiple record layout document is your best friend here).
- On the “Multiple Record Layout” tab you can set column and row spacing.
- In the dialogue box, set the options according to how you want your merged document to look (preview multiple record layout document is your best friend here).
- When you’re happy with the previewed layout, click OK.
- Note: This will create a new file that is separate from the template file.
Step 4 - Clean up the merged document according to your needs and taste.
- Fine-tuning arrangement and correcting channel layout.
- Adjusting colored arrows and system color boxes.
Step 5 - Export to PDF and print!